HR Manager — Attendance guide
Set the working week up once, then decide on what the company sends you.
Sets the module up — shifts, leave types, accrual rules — and decides on everything the company sends up: leave, corrections and weekly hours. Does not clock in; this sign-in has no working day of its own.
What you will be able to do
- Build the shift templates and put people on them, from a date
- Publish the leave types and the rule that earns the hours
- Clear a whole queue of leave or corrections in one action
- Read lateness, absence and overtime without asking for a report
What this role can and cannot do
| Can | Cannot |
|---|---|
|
|
17 steps, each one carried out in the product on .
Check what your sign-in can do #
Where Your name, top right » Profile
- Open your company's address in the browser — it looks like yourcompany.tarleaks.com.
- Type the e-mail address your administrator set up for you, then your password.
- You land on the app launcher: a grid of the apps your company uses.
- Click your name in the very top-right corner of the screen.
- Choose Profile from the menu that drops down.
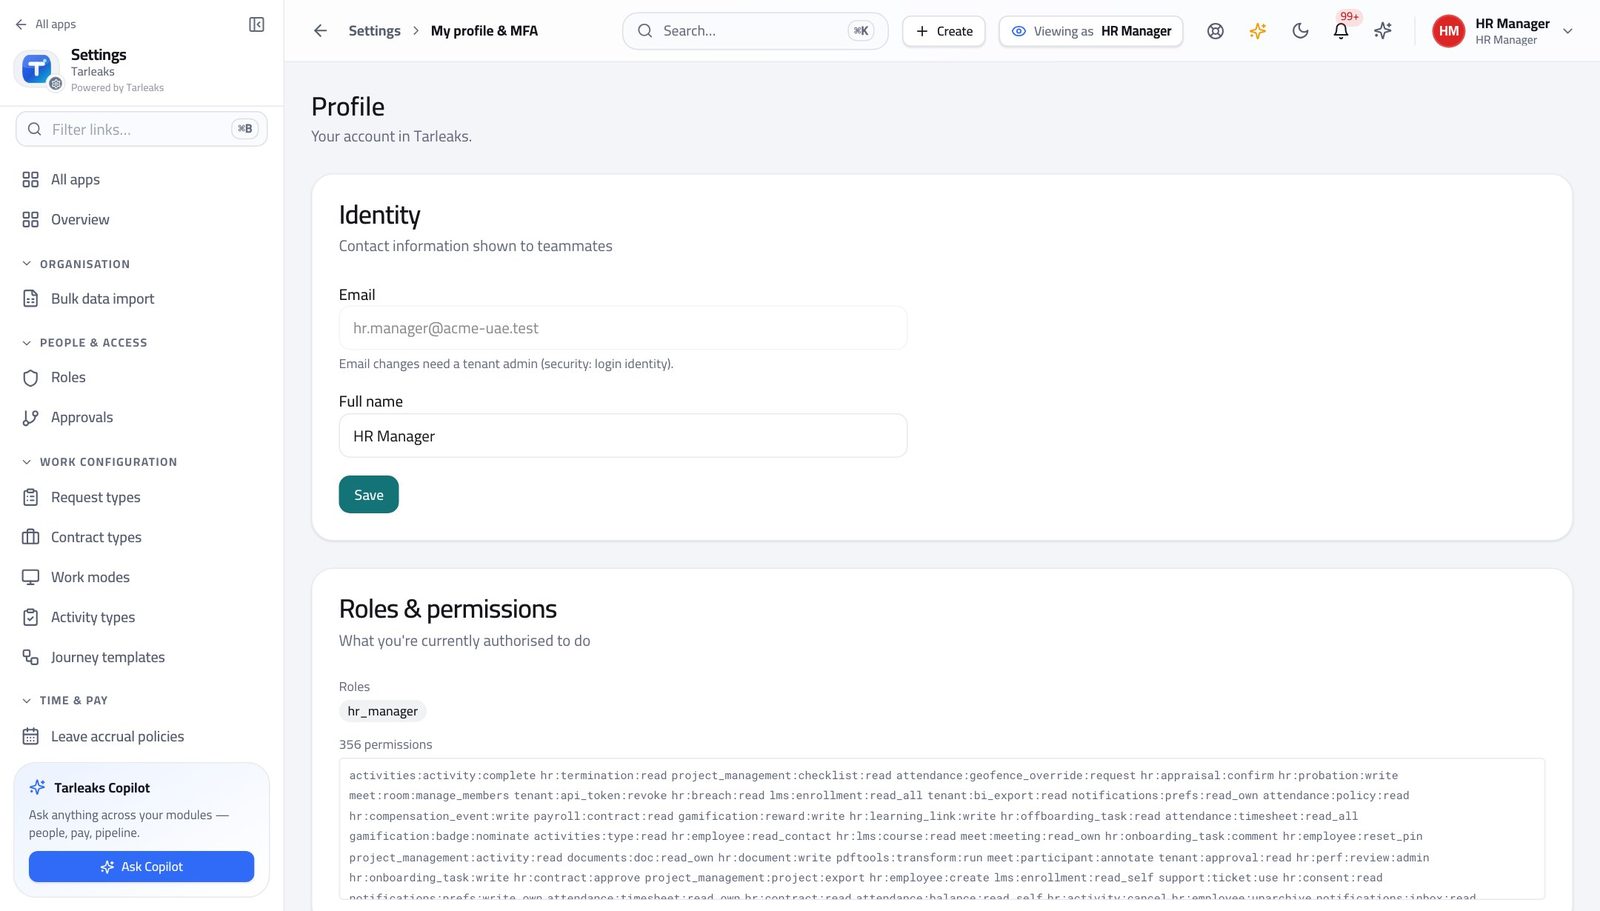
- Scroll to the Roles & permissions section.
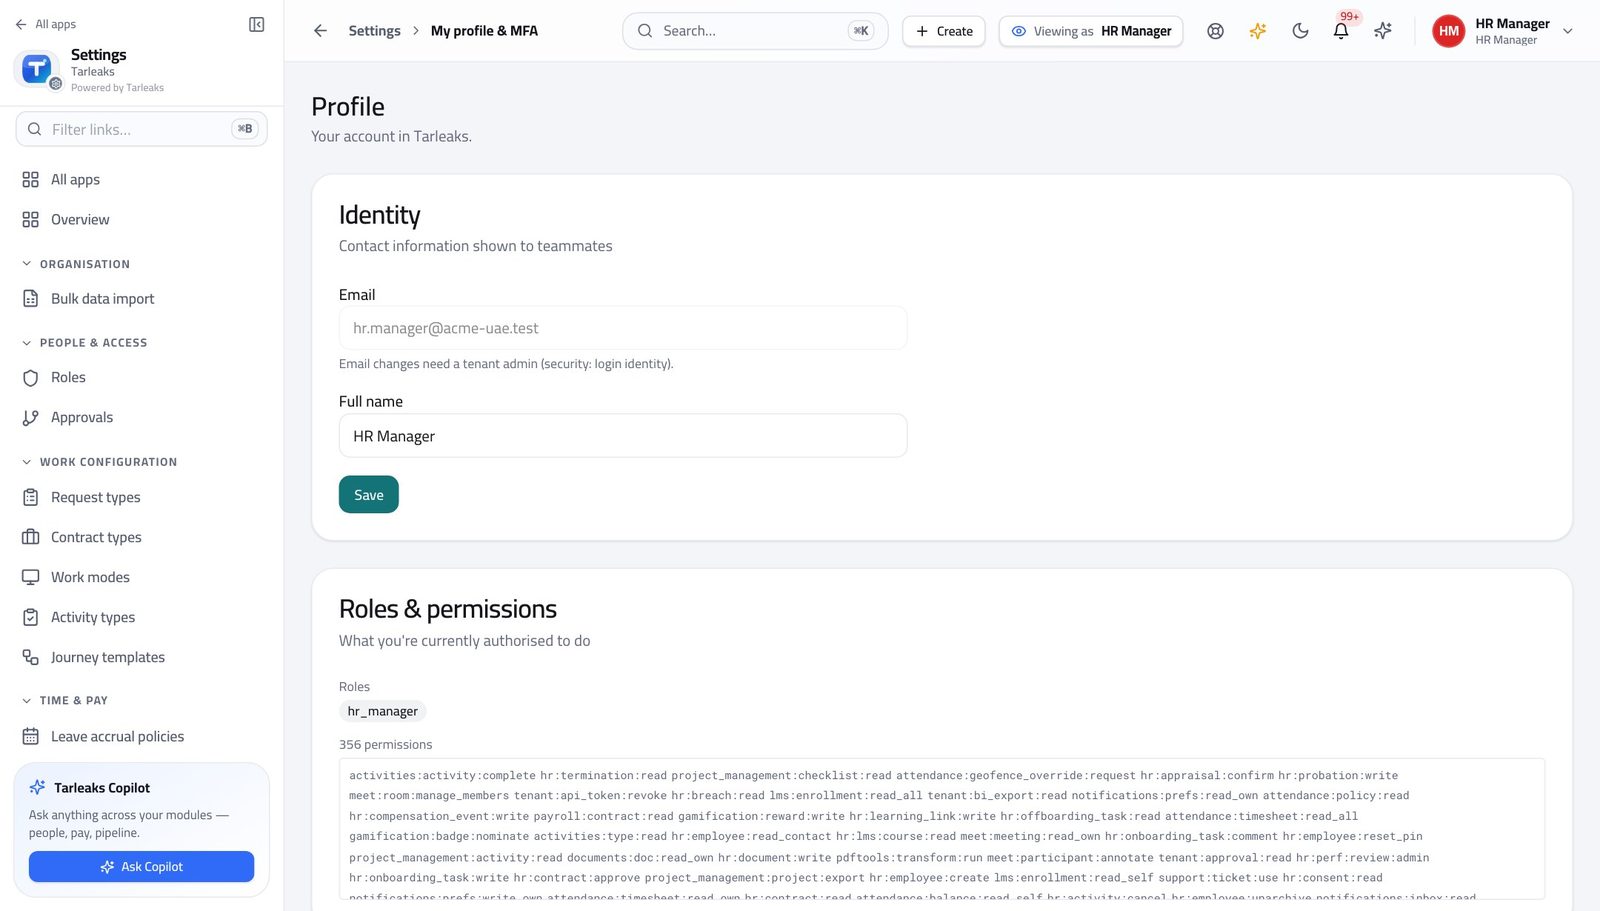
You should see The chip names the role your administrator gave you. Everything in this guide follows from that one word — including the buttons that are missing.
Watch out Two people with the same job title can hold different roles here. If the chip does not say what you expected, ask your administrator before you start deciding anything — the buttons you see depend on it.
Worth knowing If the chip is not what you expected, stop and ask your administrator before you approve anything. Two people with the same job title can hold different roles here.
See the whole day on one screen #
Where Attendance » Today
- From the launcher, click the Attendance tile.
- You land on Attendance Today — the module's home page.
- Read the four boxes across the top: Present, Remote, Late, On Leave.
- Click On Leave to jump straight to the leave screen.
- In the roster underneath, click the ⋯ at the end of a row for that person's timesheet, leave or record.
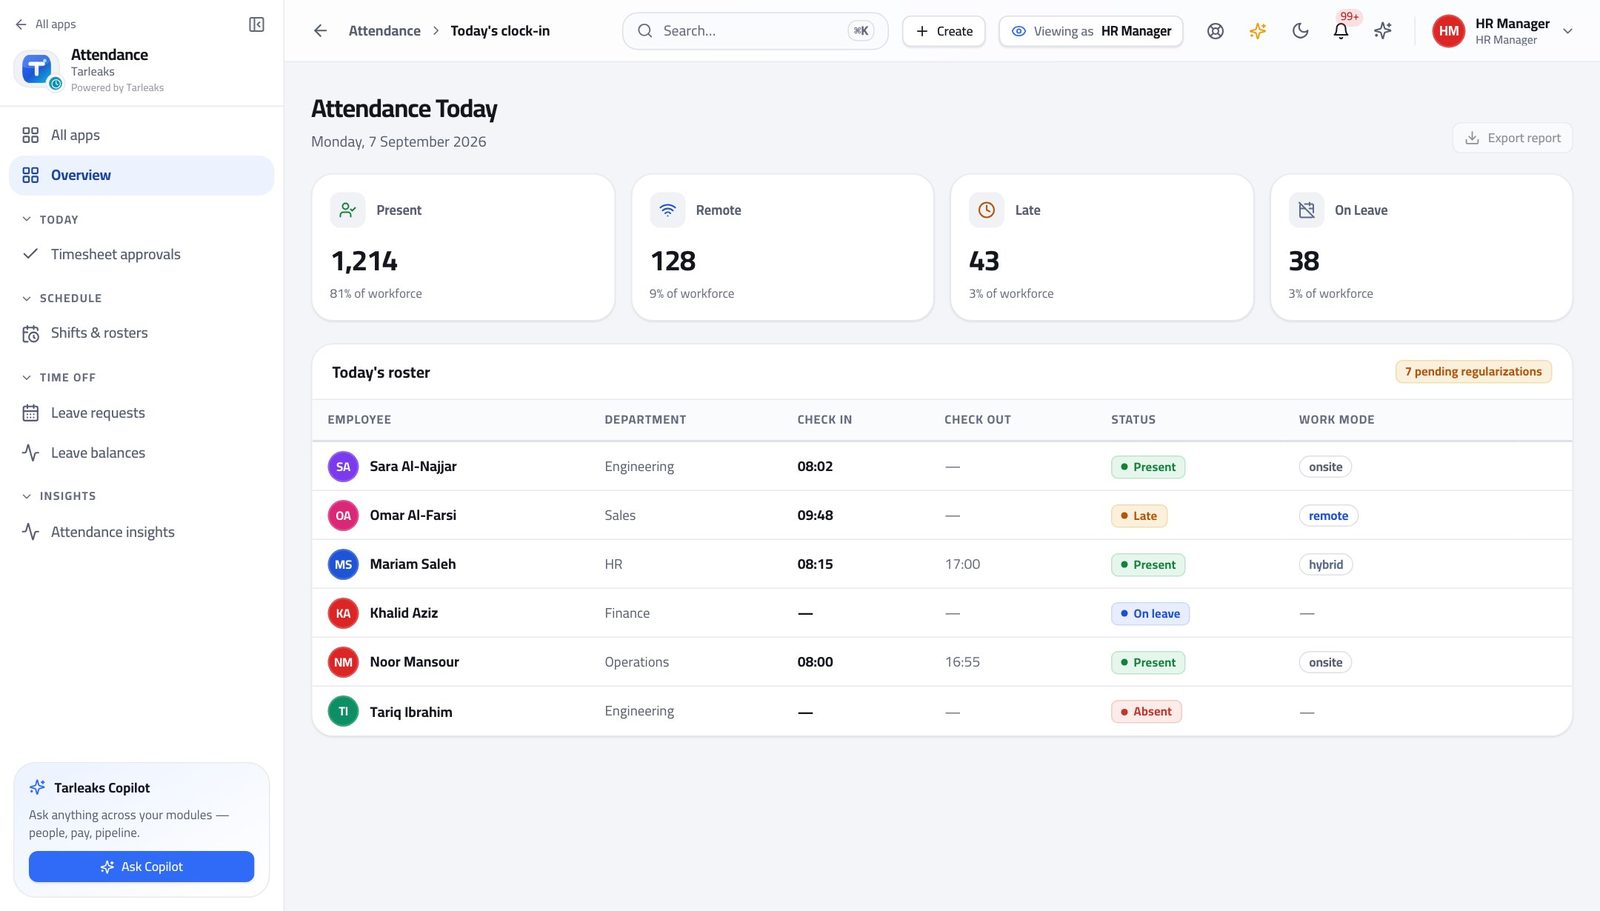
You should see Who is in, who is late and who is off — for today, without running anything. The row menu at the end of each line opens that person's timesheet, their leave, or their record.
Watch out A dash in the check-out column means the person has not clocked out yet — not that they left without doing so. Read it after the end of their shift, not during it.
Worth knowing Export report, top right, gives you the same list as a spreadsheet with the check-in and check-out times already in it.
Set up the working patterns people are held to #
Where Attendance » Shifts & rosters
- In the left menu, under SCHEDULE, click Shifts & rosters.
- Use the day buttons above the table to show only shifts that run on a given day.
- Search by name when you have many templates.
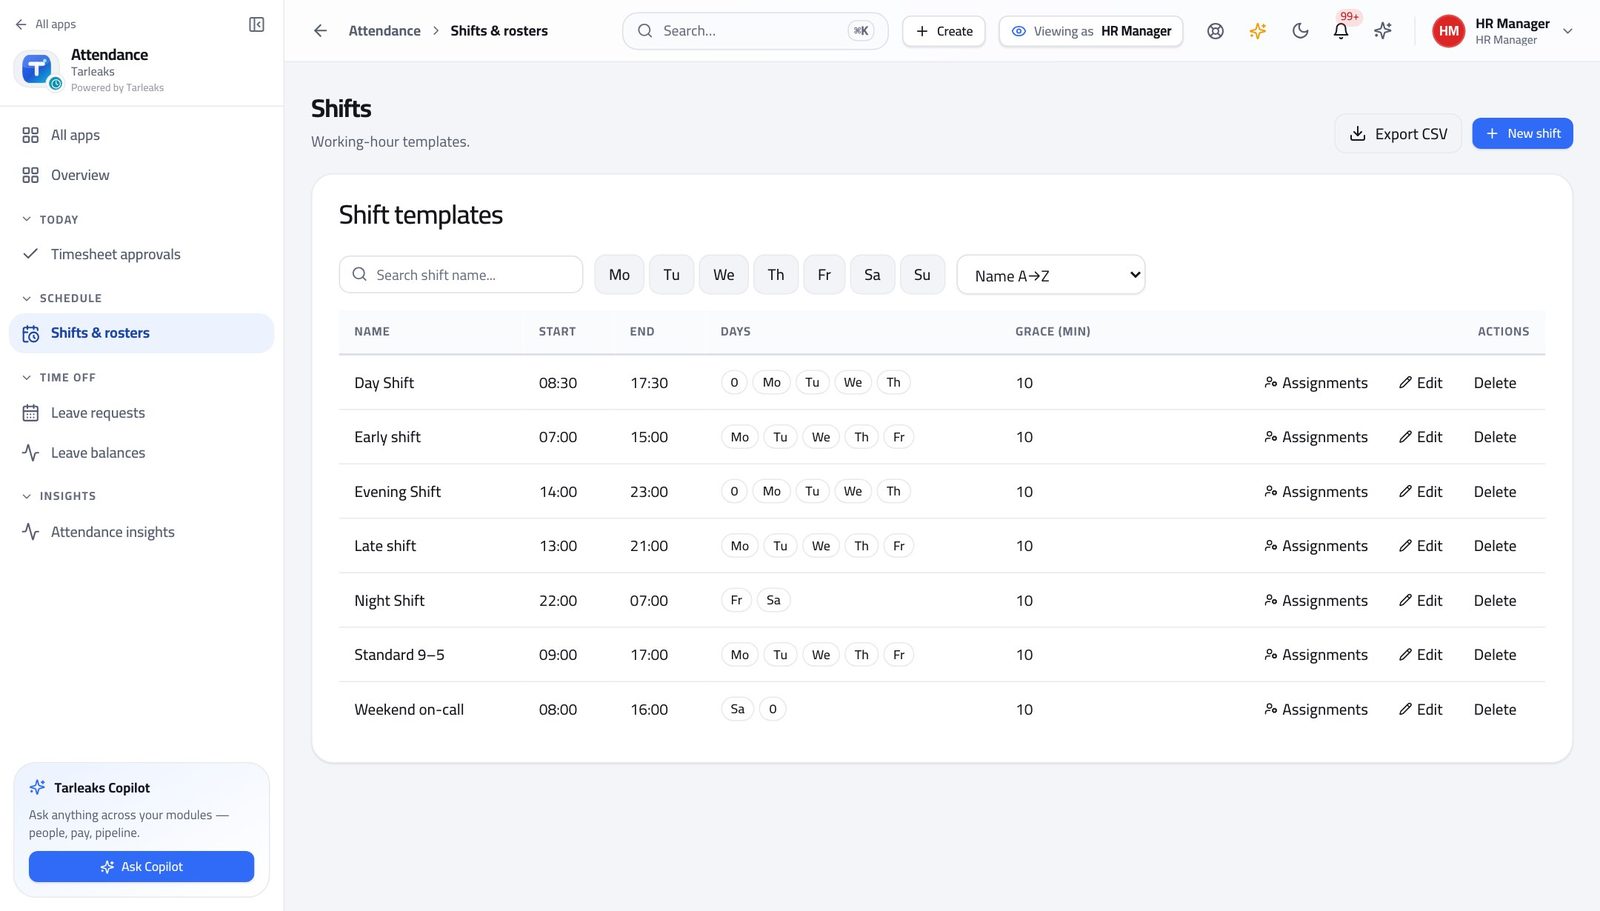
You should see A shift is a template the whole company reuses. Grace is the number of minutes after the start time that still counts as on time — it is the single setting most arguments about lateness come down to.
Watch out Changing a shift's times changes them for everybody on it from that moment. If only some people are moving, make a second template and reassign them instead.
Create a shift template #
Where Attendance » Shifts & rosters » New shift
- On Shifts & rosters, press New shift at the top right.
- Type the name.
- Set Start time and End time in 24-hour form.
- Set Grace minutes.
- Tick the Days of week the shift runs.
- Save.
| Field | What to put in it |
|---|---|
| Name | What people will call it — 'Day Shift', 'Night Shift', 'Ramadan Hours'. It appears on the roster and in reports. |
| Start time | When the shift begins, as HH:MM. This is the time lateness is measured from. |
| End time | When it ends, as HH:MM. A shift that ends before it starts is treated as running past midnight. |
| Grace minutes | How many minutes after the start still count as on time. Ten is common; zero makes every traffic jam a lateness conversation. |
| Days of week | Tick the working days. This is where a Sunday-to-Thursday week is expressed. |
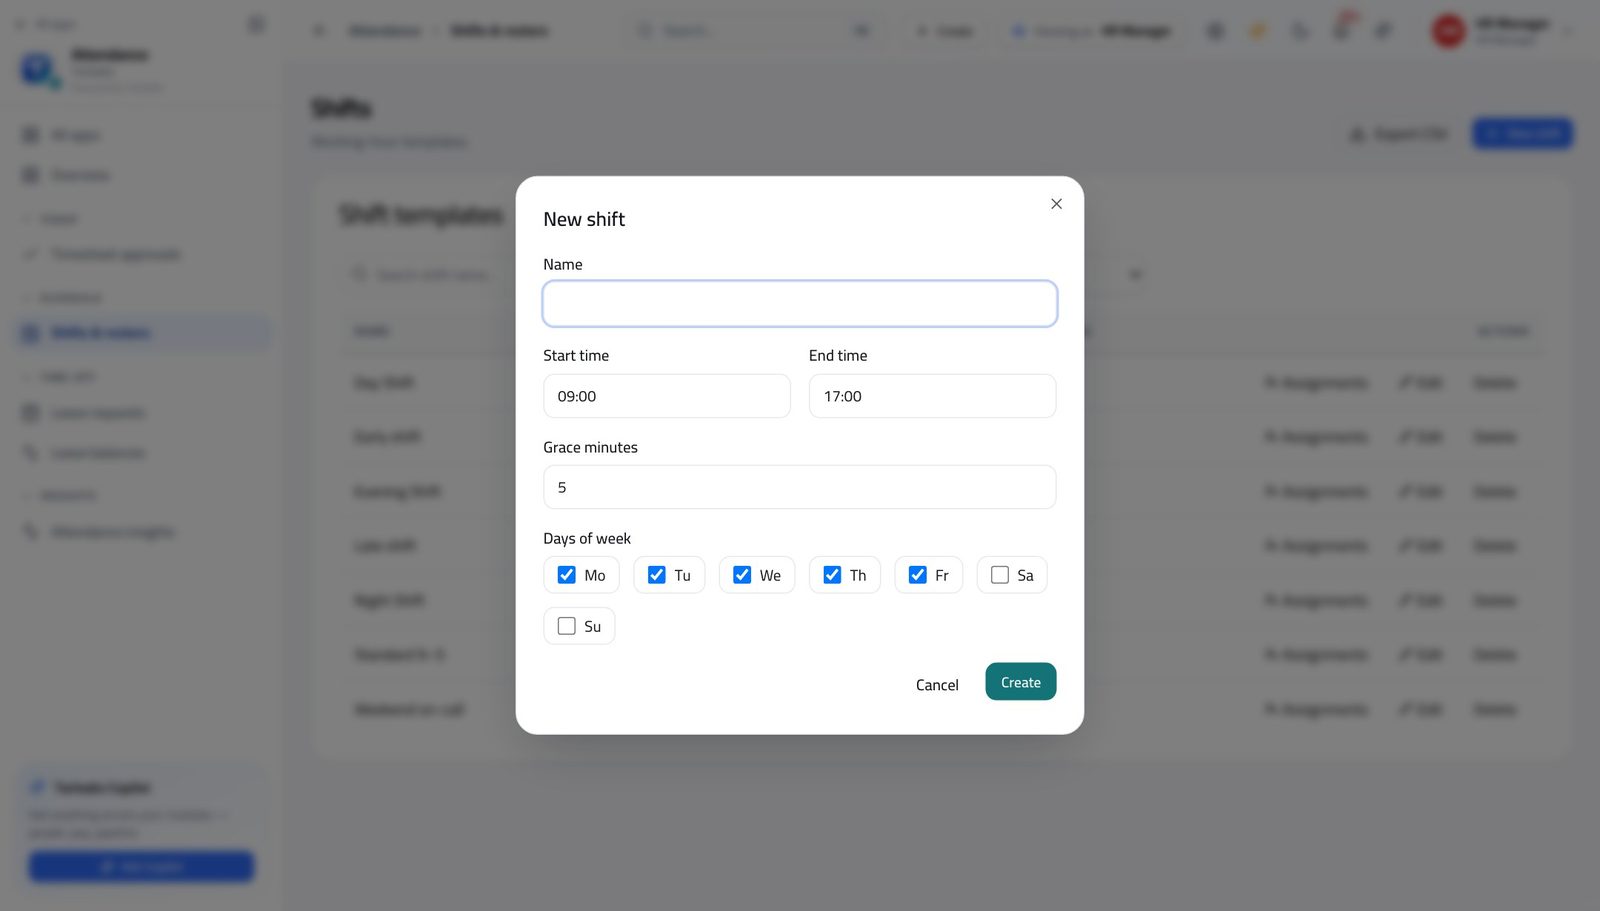
You should see One template serves everybody on that pattern. You are not setting hours per person — you are describing a pattern and then putting people on it.
Watch out Creating the template does not put anybody on it. Use Assignments afterwards, or the roster stays empty.
Worth knowing Close the form without saving and nothing is created — you can open it just to see the fields.
Put people on a shift, from a date #
Where Attendance » Shifts & rosters » Assignments
- On Shifts & rosters, find the shift and press Assignments on its row.
- Read the list: one row per person, with the date they went onto this shift.
- Choose an employee in the box at the top and press Assign to add somebody.
- Press End today on a row to take somebody off it.
- Tick Include past assignments to see the ones already ended.
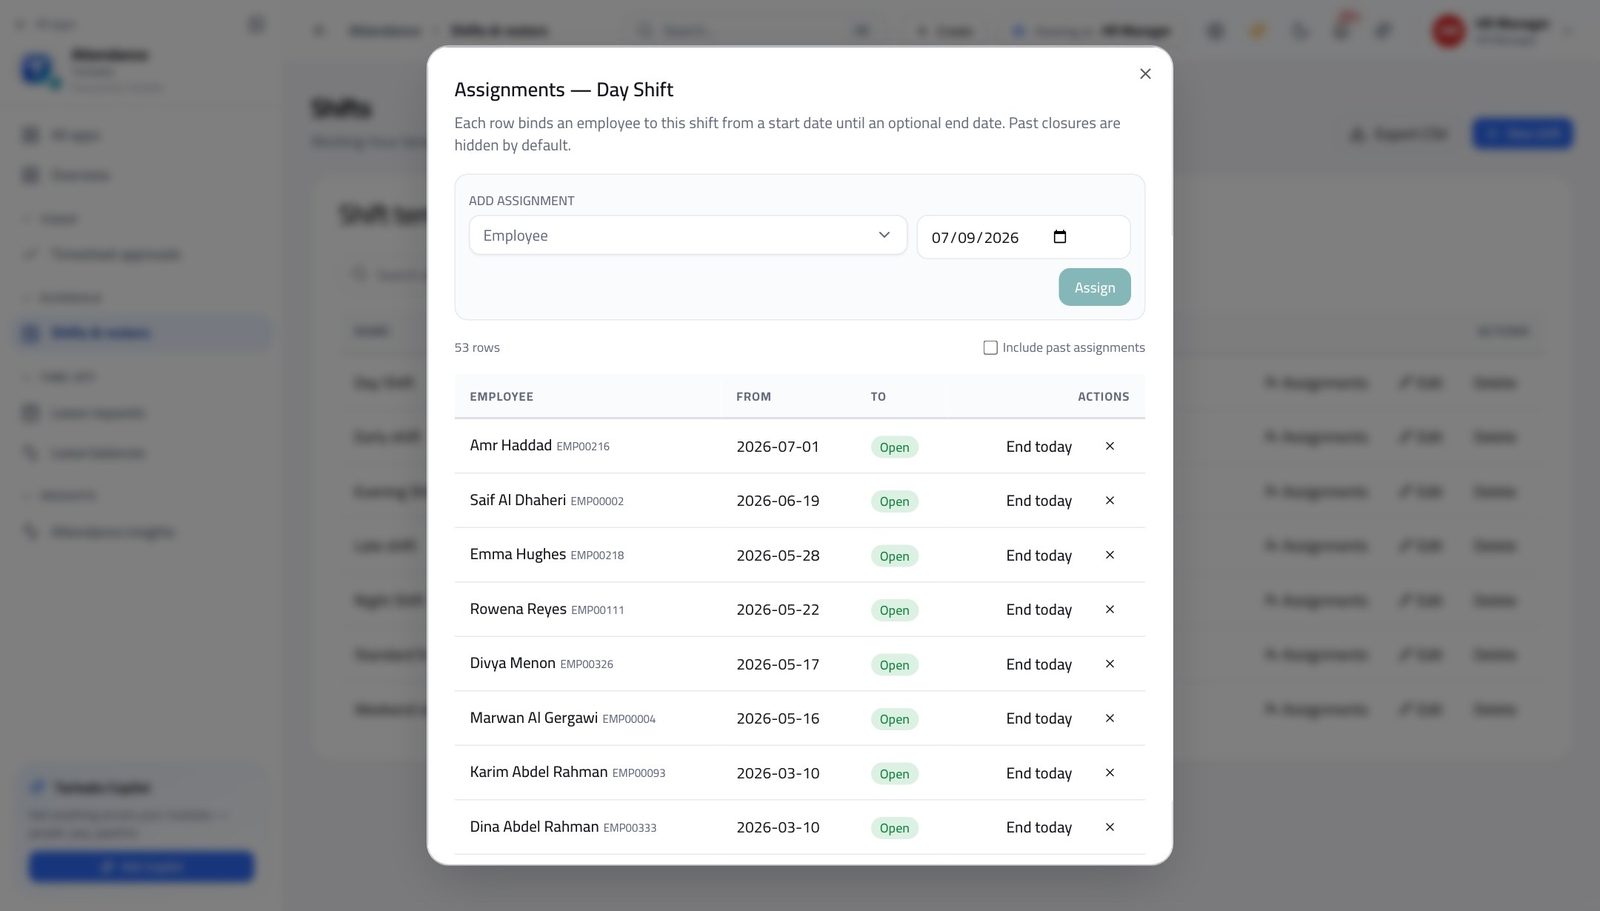
You should see Each row binds one person to that shift from a start date until an optional end date. Moving somebody is dated, so last month's timesheet still reads against last month's shift.
Watch out End today closes the assignment; it does not delete it. That is deliberate — last month's timesheet still has to read against last month's shift.
Worth knowing End today closes an assignment without deleting it. Deleting the row would rewrite history; ending it does not.
Publish the kinds of leave people may ask for #
Where Attendance » Leave » Leave types
- In the left menu, under TIME OFF, click Leave requests.
- Scroll to the Leave types card and press Show if it is collapsed.
- Read Name, Paid and Default days per year on each row.
- Press Edit on a row to change one.
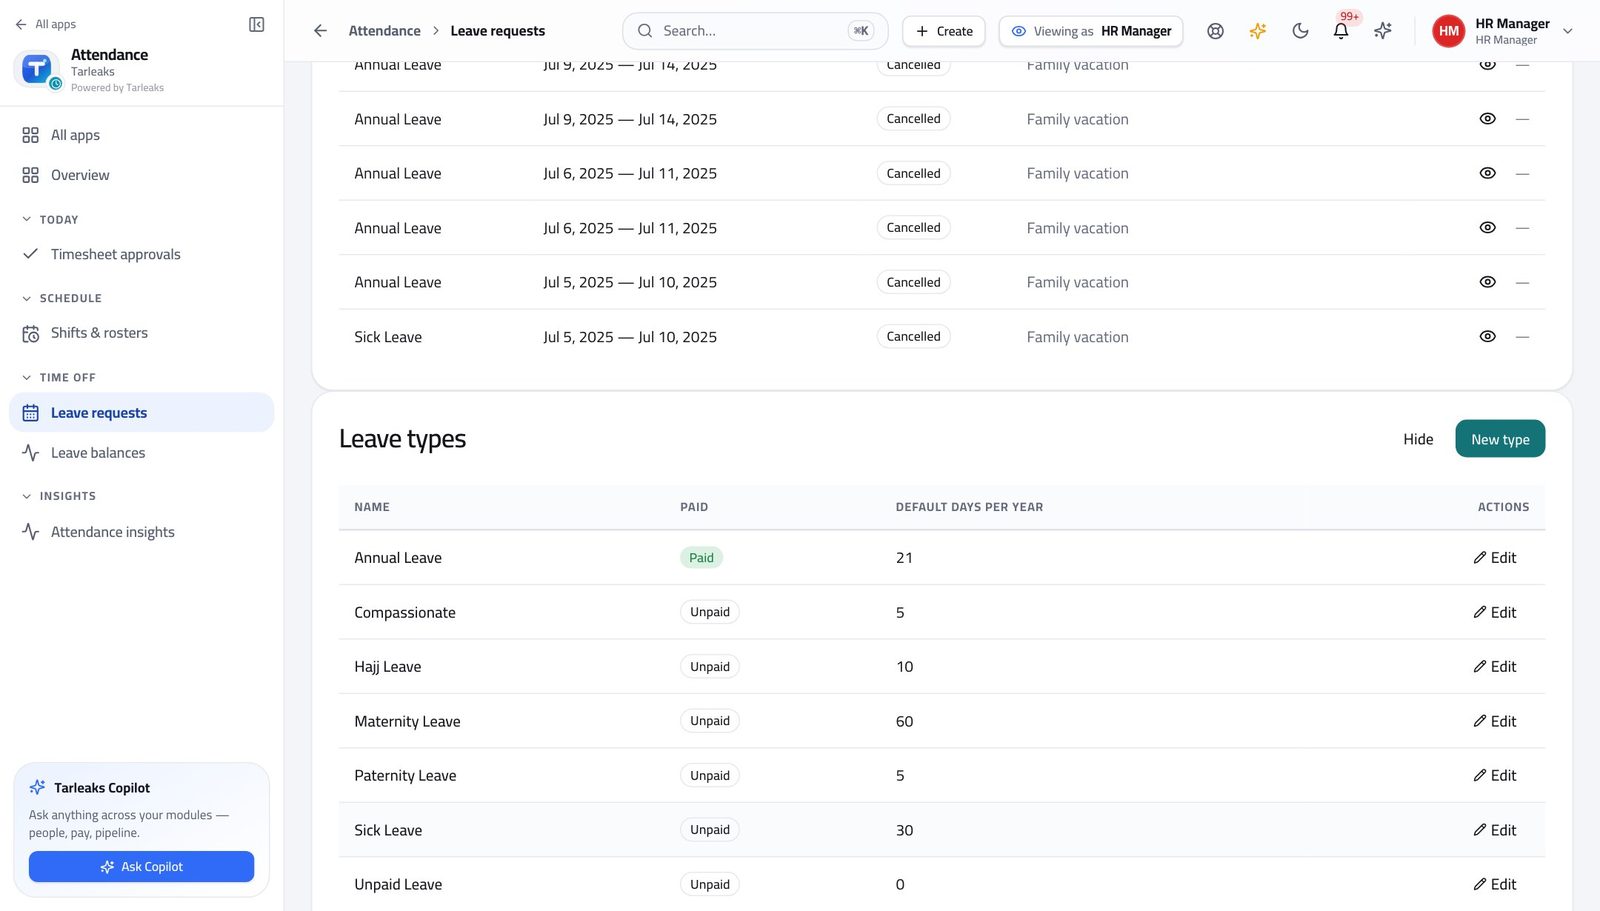
You should see Default days per year is the yearly entitlement attached to the TYPE. It is not the same number as somebody's accrued balance — that is earned month by month, in hours, by the accrual rule.
Watch out Default days per year is the entitlement on the TYPE. It is NOT somebody's balance — that is earned in hours by the accrual rule, and confusing the two is the most common leave question HR gets.
Add a kind of leave #
Where Attendance » Leave » Leave types » New type
- In the Leave types card, press New type.
- Type the name.
- Tick Paid leave if it is paid.
- Set Default days per year.
- Save.
| Field | What to put in it |
|---|---|
| Name | What people will pick from the list: 'Annual Leave', 'Sick Leave', 'Unpaid Leave', 'Hajj Leave'. |
| Paid leave | Ticked means the days are paid. Untick it for unpaid leave — payroll reads this. |
| Default days per year | The yearly entitlement carried by this type. It sets the expectation; the accrual policy decides how the hours actually arrive. |
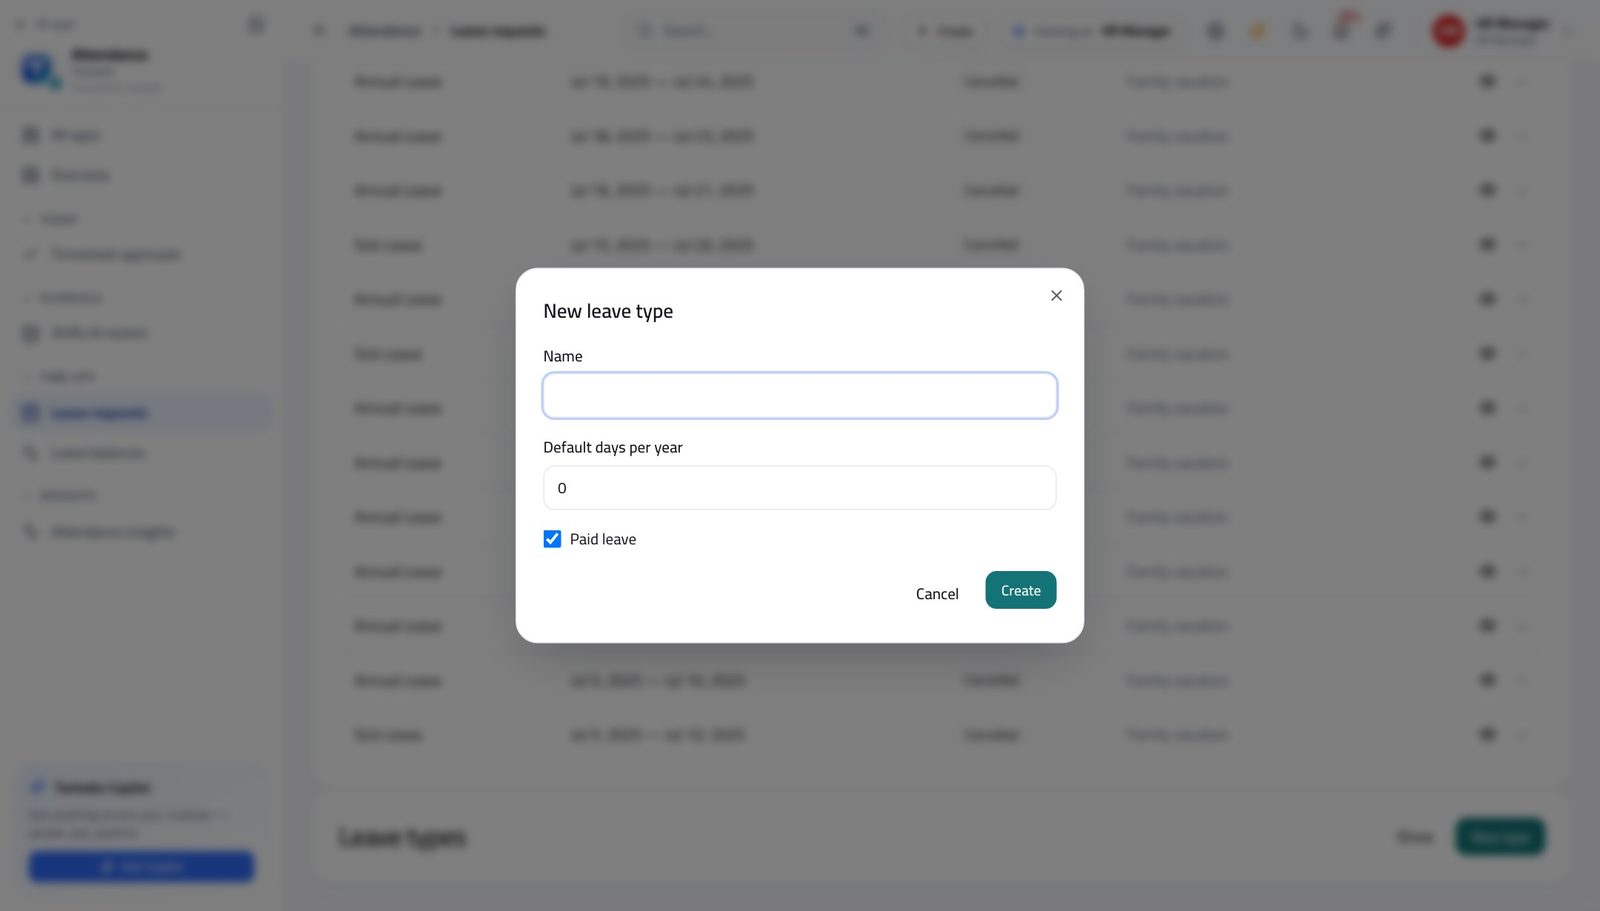
You should see This creates the OPTION people choose from. How the hours are earned month by month is a separate thing — that is the accrual policy.
Watch out Do not create a second type for a variation — 'Annual Leave (Senior)' means two entries in every report forever. Vary the accrual policy instead and keep one type.
Work the leave queue for the whole company #
Where Attendance » Leave » Approval queue
- Open Leave requests.
- Use the status dropdown to show Pending only.
- Narrow further by type, or by a date range, using the two date boxes.
- Sort by Longest to bring the biggest requests to the top.
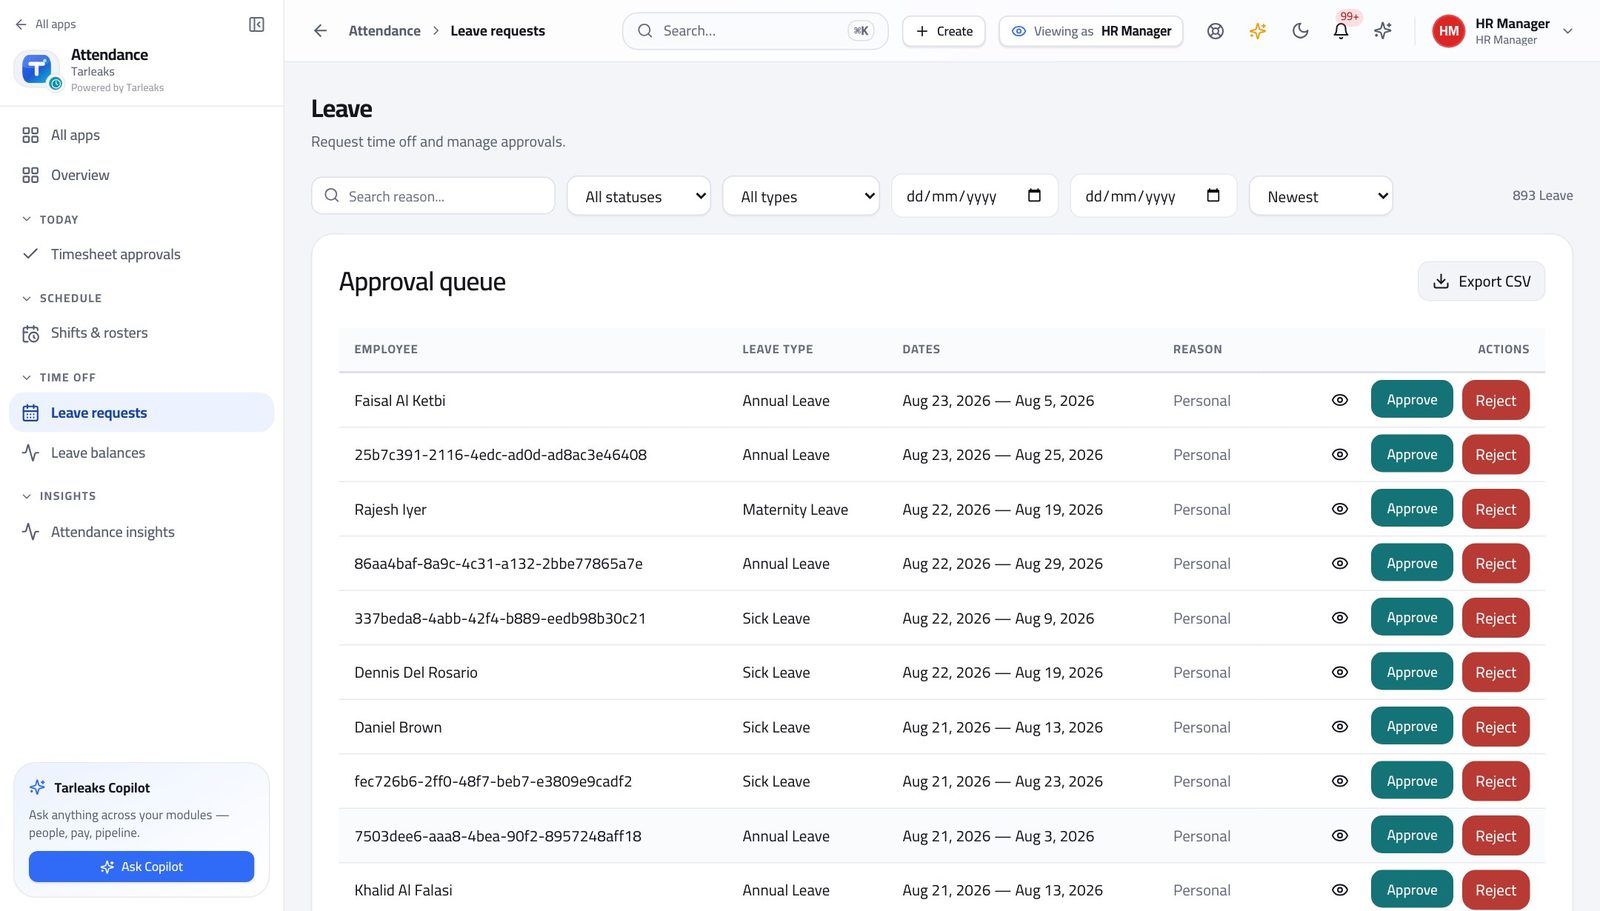
You should see Every request in the company that is waiting on a decision, in one place. The count in the bar tells you how much is actually outstanding.
Watch out The filters are written into the web address. Copy it and a colleague opens exactly your view, not the default one.
Worth knowing The filters are written into the web address, so you can bookmark 'annual leave, pending, next month' and come back to it.
Decide a whole queue in one action #
Where Attendance » Leave » tick rows » Approve
- With the queue filtered to Pending, tick the box at the start of each row you have decided on.
- A bar appears along the bottom saying how many are selected.
- Press Approve in that bar.
- Read what the confirmation says, then confirm.
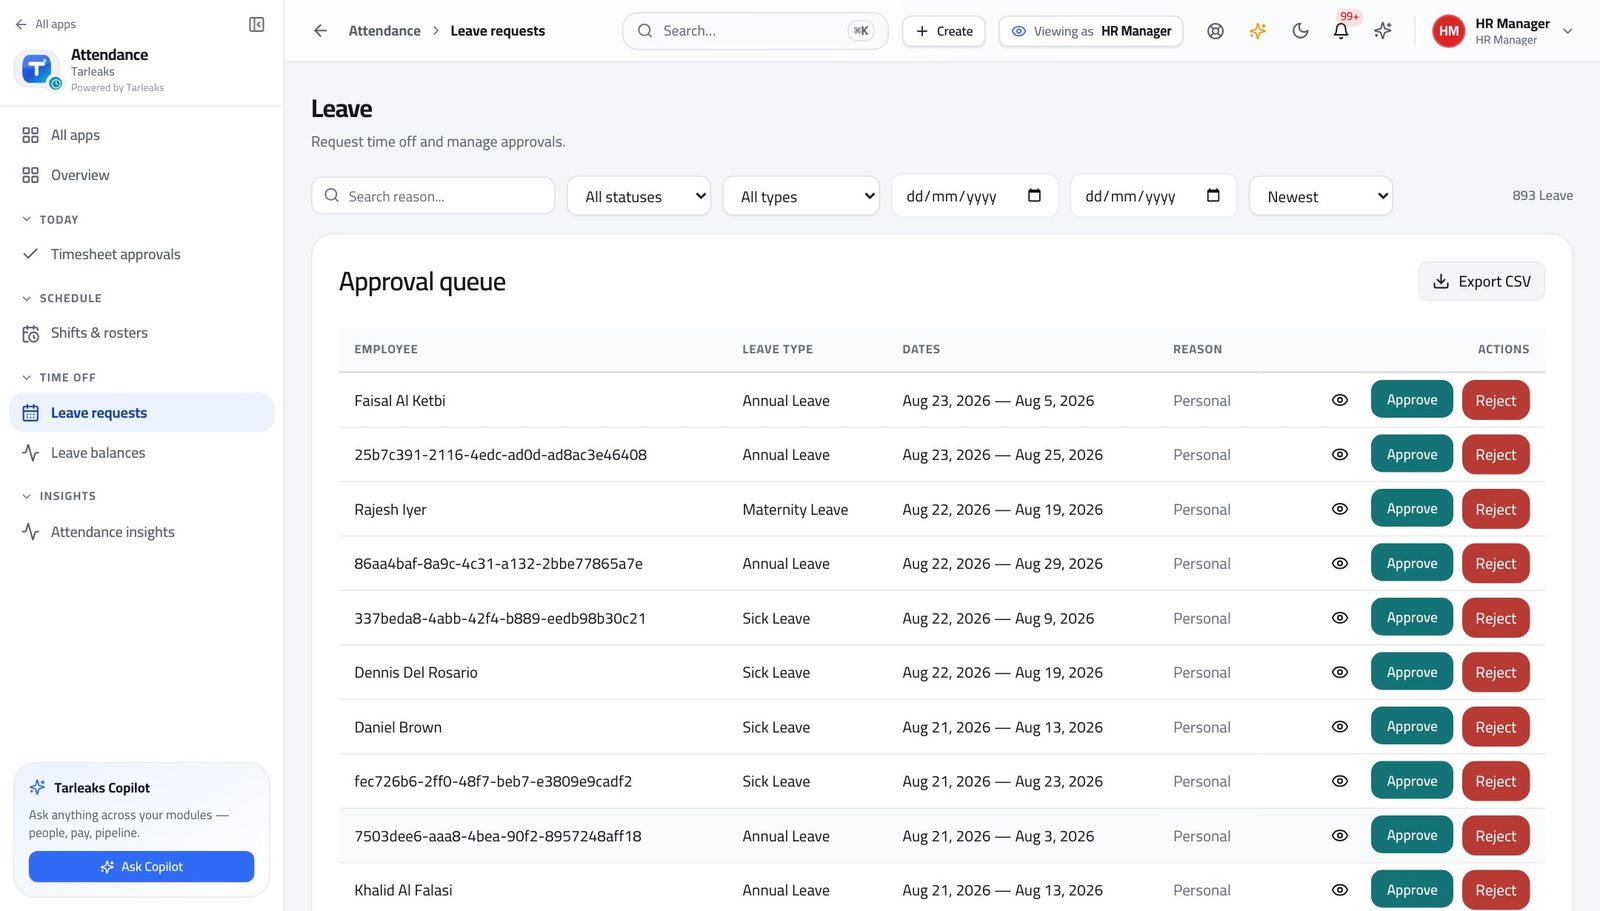
You should see Every row is still checked on its own inside the batch — balance, overlap, and whether the person is yours to decide for. A row that fails is named and the rest still go through.
Watch out Ticking the box in the header row selects everything the CURRENT FILTER shows, not the whole list. Filter first, then select all.
Worth knowing Ask for a practice run first when the batch is large: every row is validated against the real path and then rolled back, so you see what would have failed without changing anything.
Deal with missed punches #
Where Attendance » Regularizations
- In the left menu, click Regularizations.
- The status dropdown starts on Pending.
- Read the day, the requested check-in and check-out, and the reason.
- Press the eye icon to open the full detail before deciding.
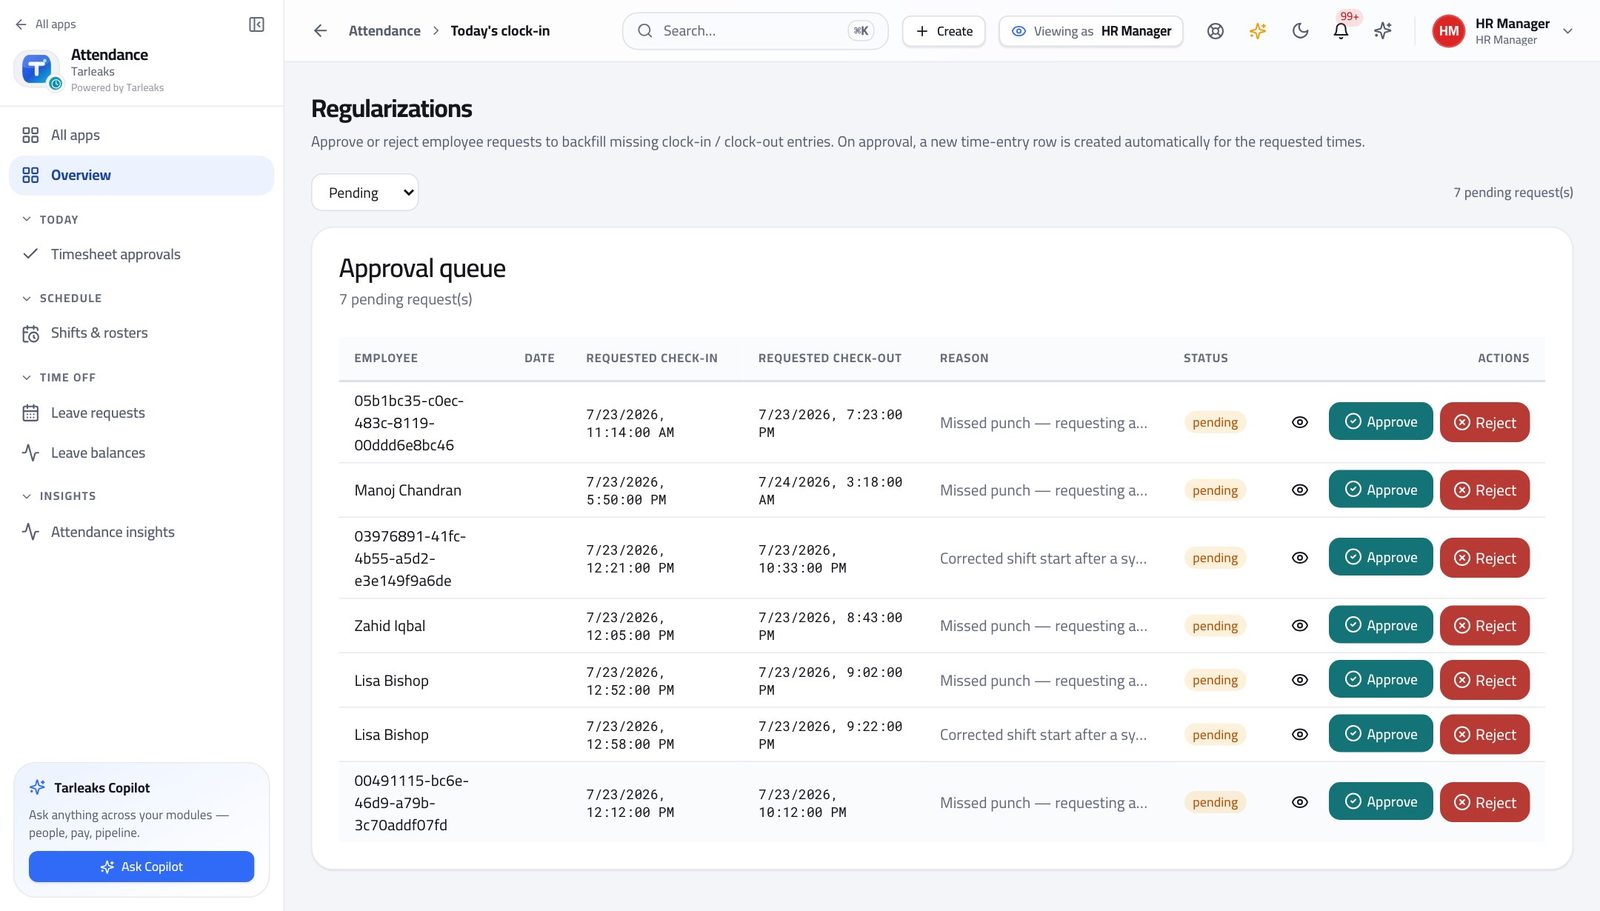
You should see A correction is somebody saying 'I was here, the clock does not show it'. Approving one writes the missing clock record for that day automatically — you do not type it in afterwards.
Watch out Approving a correction adds hours somebody will be paid for. Read the reason every time — this is the one queue where speed is not the virtue.
Clear a run of corrections together #
Where Attendance » Regularizations » Approve
- On Regularizations, work down the pending list.
- Press Approve on the rows you accept, Reject on the ones you do not.
- Switch the filter to Approved afterwards to confirm the batch landed.
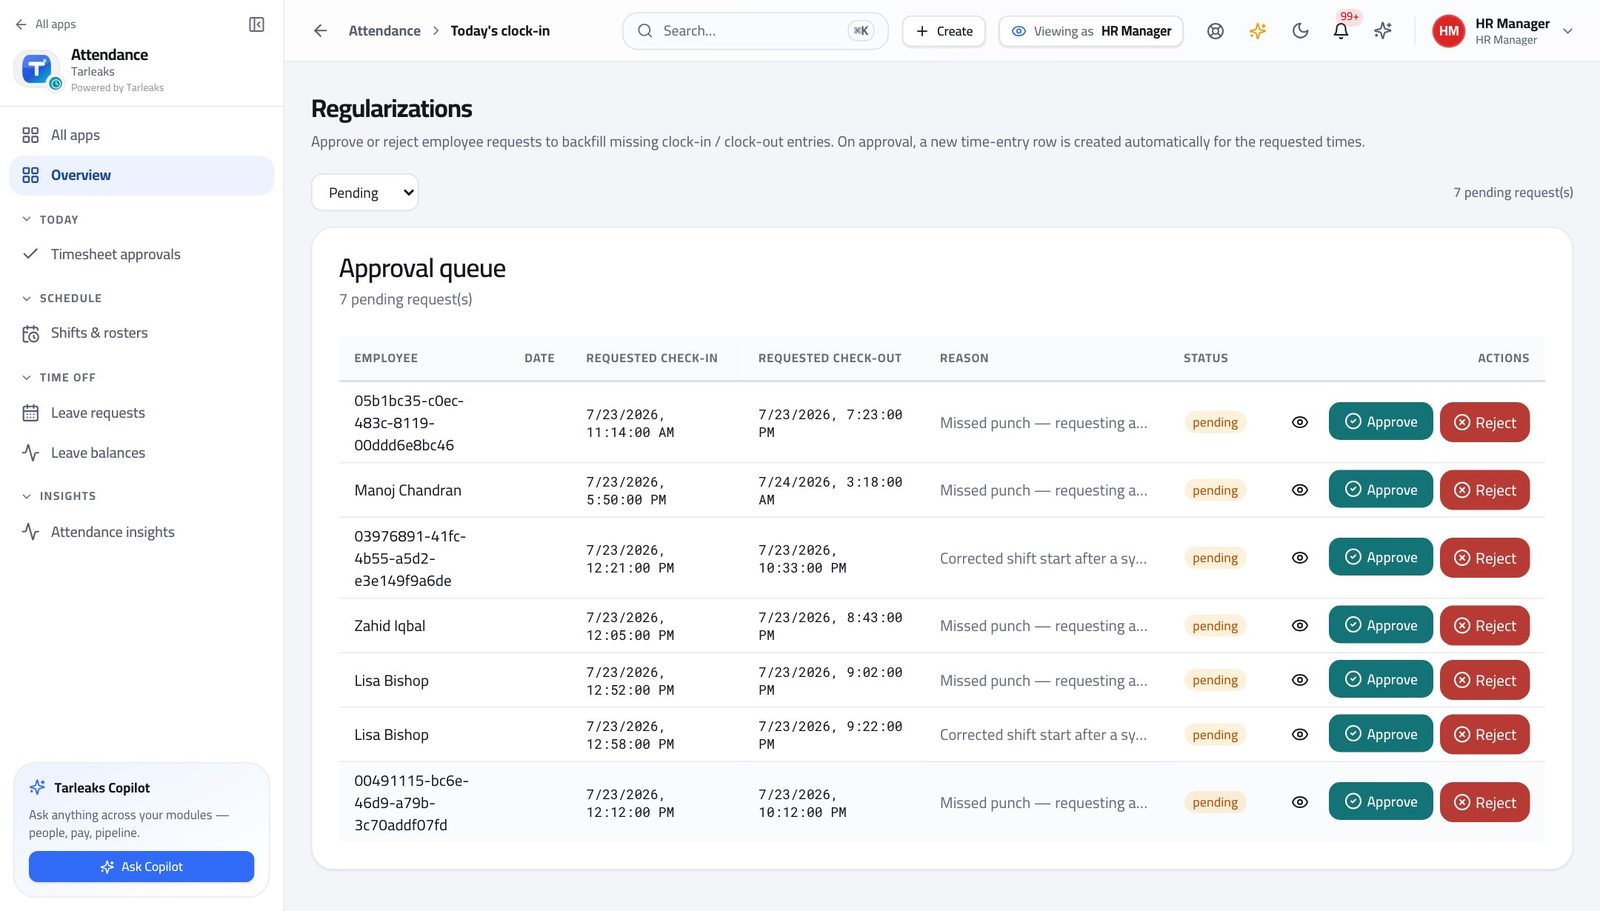
You should see Each approval still writes its own clock record, so one bad row is named rather than costing you the rest of the batch.
Watch out A correction with no reason, or a reason that says only 'forgot', is the one to open. Your company can require a reason on every correction; that switch is in the administrator's attendance settings.
Worth knowing A correction with no reason is the one to open. The company can require a reason on every correction — that switch is in the administrator's attendance settings.
Approve the week, not the day #
Where Attendance » Timesheet approvals
- In the left menu, under TODAY, click Timesheet approvals.
- Stay on Waiting on me.
- Read the hours, the billable split, and any exceptions on the row.
- Press the tick to approve, or Send back and type the reason.
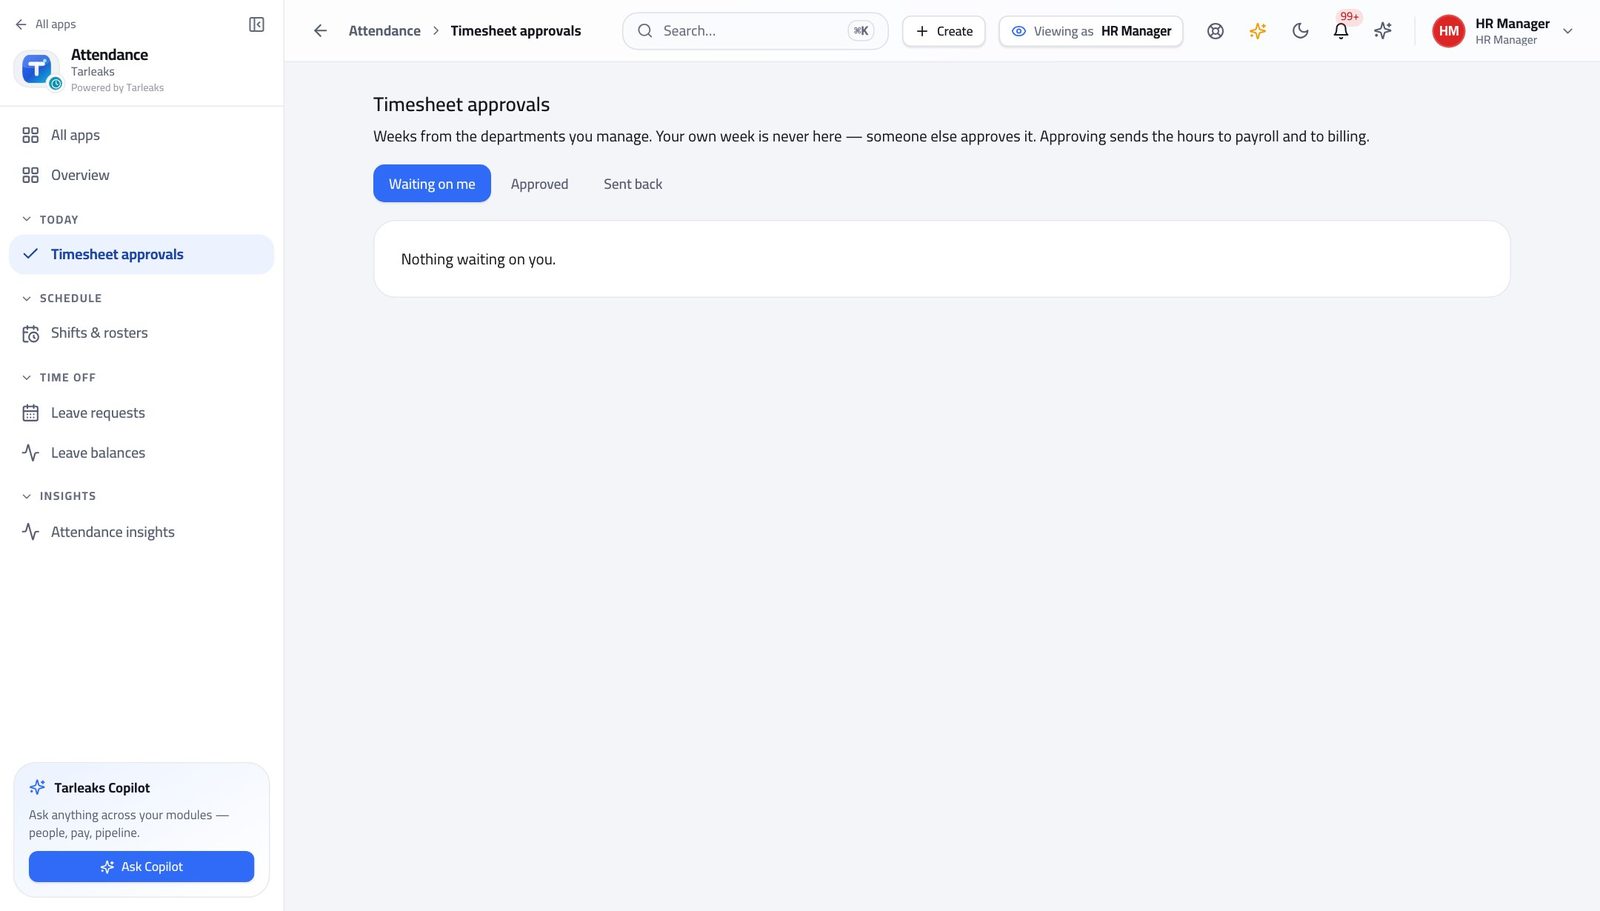
You should see One decision covers a whole week, and everything you need to make it is on the row — the total, the billable split, and the exceptions the system found. Approving sends those hours on to payroll and to billing.
Watch out Sending a week back REQUIRES a reason, and it stays on the employee's screen until they act on it. Write a sentence they can act on, not 'wrong'.
Worth knowing Sending a week back REQUIRES a reason, and the reason stays on the employee's screen until they fix it. That is deliberate: a rejection that vanishes gets resubmitted unchanged.
Write the rule that earns the hours #
Where Settings » Leave accrual policies
- In the left menu, open Settings, then under TIME & PAY click Leave accrual policies.
- Read each row: Name, Leave type, Rate, Period, cap, carry-over and Effective.
- Press Assign on a policy to see which departments, positions, branches or people it covers.
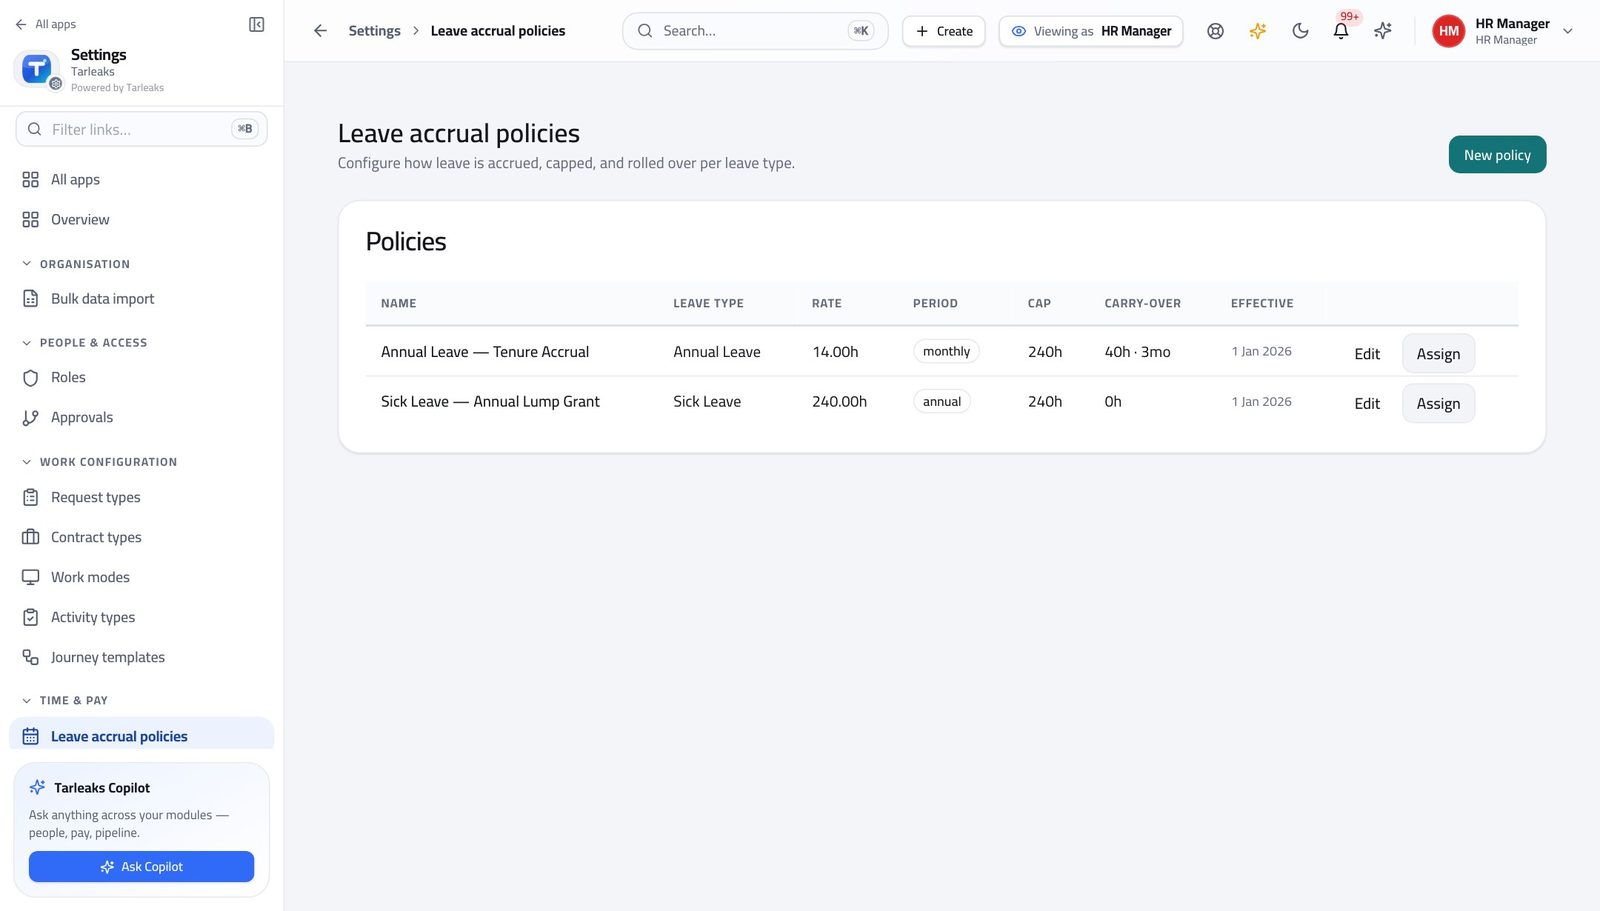
You should see A balance is not granted by hand — it is produced by one of these rules, in hours, on a schedule. When somebody asks why they have what they have, the answer is this screen.
Watch out A policy assigned to nobody earns nobody anything. After writing one, always open Assign.
Worth knowing Carry-over has an expiry in months. Hours that expire are recorded as an expiry line on the person's ledger rather than quietly disappearing.
Write an accrual rule #
Where Settings » Leave accrual policies » New policy
- On Leave accrual policies, press New policy.
- Give it a name and pick the Leave type it fills.
- Set the accrual rate in hours and the Accrual period.
- Set the cap, the carry-over maximum, and how many months carry-over survives.
- Set Effective from, then save.
- Press Assign on the new policy and choose who it covers.
| Field | What to put in it |
|---|---|
| Name | Say what it is for in the name — 'UAE annual leave — standard' beats 'Policy 2'. |
| Leave type | Which type this rule fills. One type can have several policies for different groups of people. |
| Accrual rate (hours) | How many hours are earned each period. This is hours, not days — the whole balance is kept in hours. |
| Accrual period | Monthly, per pay period, quarterly, annual, or on the person's work anniversary. |
| Cap (hours) | The most the balance may reach. Leave it blank for no ceiling. |
| Carry-over maximum | How many hours may cross into next year. |
| Carry-over expiry (months) | How long carried hours survive before they expire. Expiry is recorded as a line on the ledger, not a silent loss. |
| Waiting period (days) | How long somebody must be employed before they start earning. |
| Effective from | The date the rule starts applying. Balances already earned are never rewritten. |
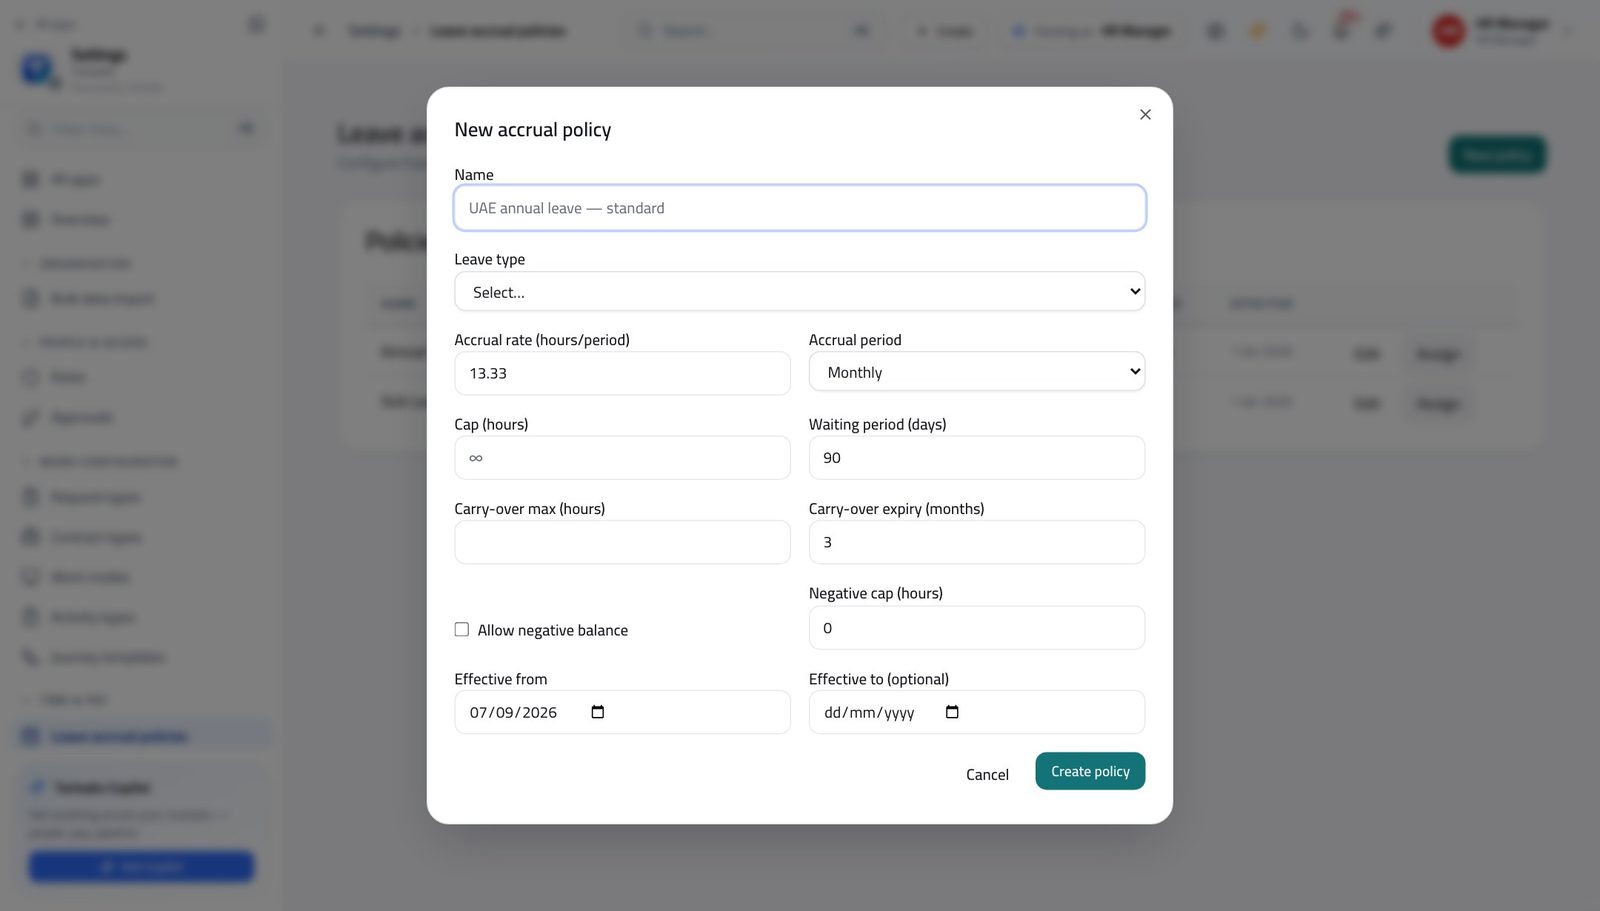
You should see The rule is what actually fills people's balances, in hours, on a schedule. It takes effect from a date, so it never rewrites what has already been earned.
Watch out Effective from is the safety catch. Set it to the start of next month rather than backdating, unless you genuinely mean to change what people have already earned.
Worth knowing After saving, press Assign on the policy: a rule that is not assigned to anybody earns nobody anything.
Read how the company is actually doing #
Where Attendance » Attendance insights
- In the left menu, under INSIGHTS, click Attendance insights.
- Read the four boxes: Compliance rate, Avg check-in, Late arrivals, Overtime total.
- Click a box to open the screen it summarises.
- Press Refresh to recompute.
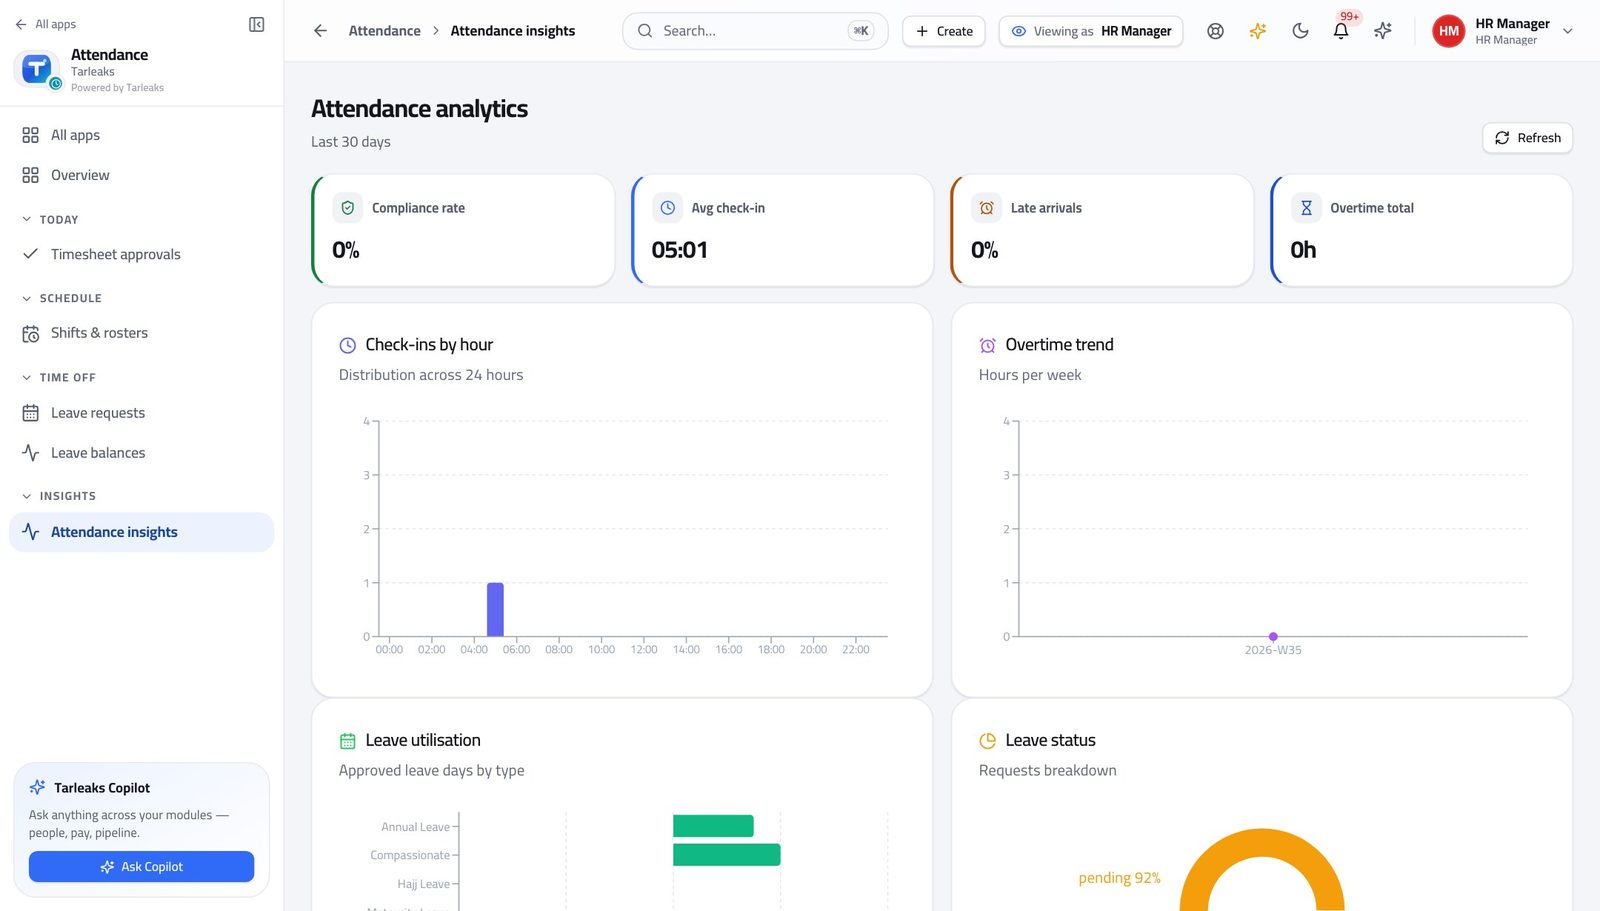
You should see Every figure is computed from clock records already in the system. Nothing here is typed in, which is why it agrees with the day view.
Watch out These are the last thirty days. A single bad week moves the average visibly — look at the trend chart before you read anything into one number.
Look at absence and overtime over a period #
Where Attendance » Attendance insights
- Still on Attendance insights, read Overtime trend — hours per week.
- Read Leave utilisation — approved leave days by type.
- Read Leave status — the breakdown of requests by what happened to them.
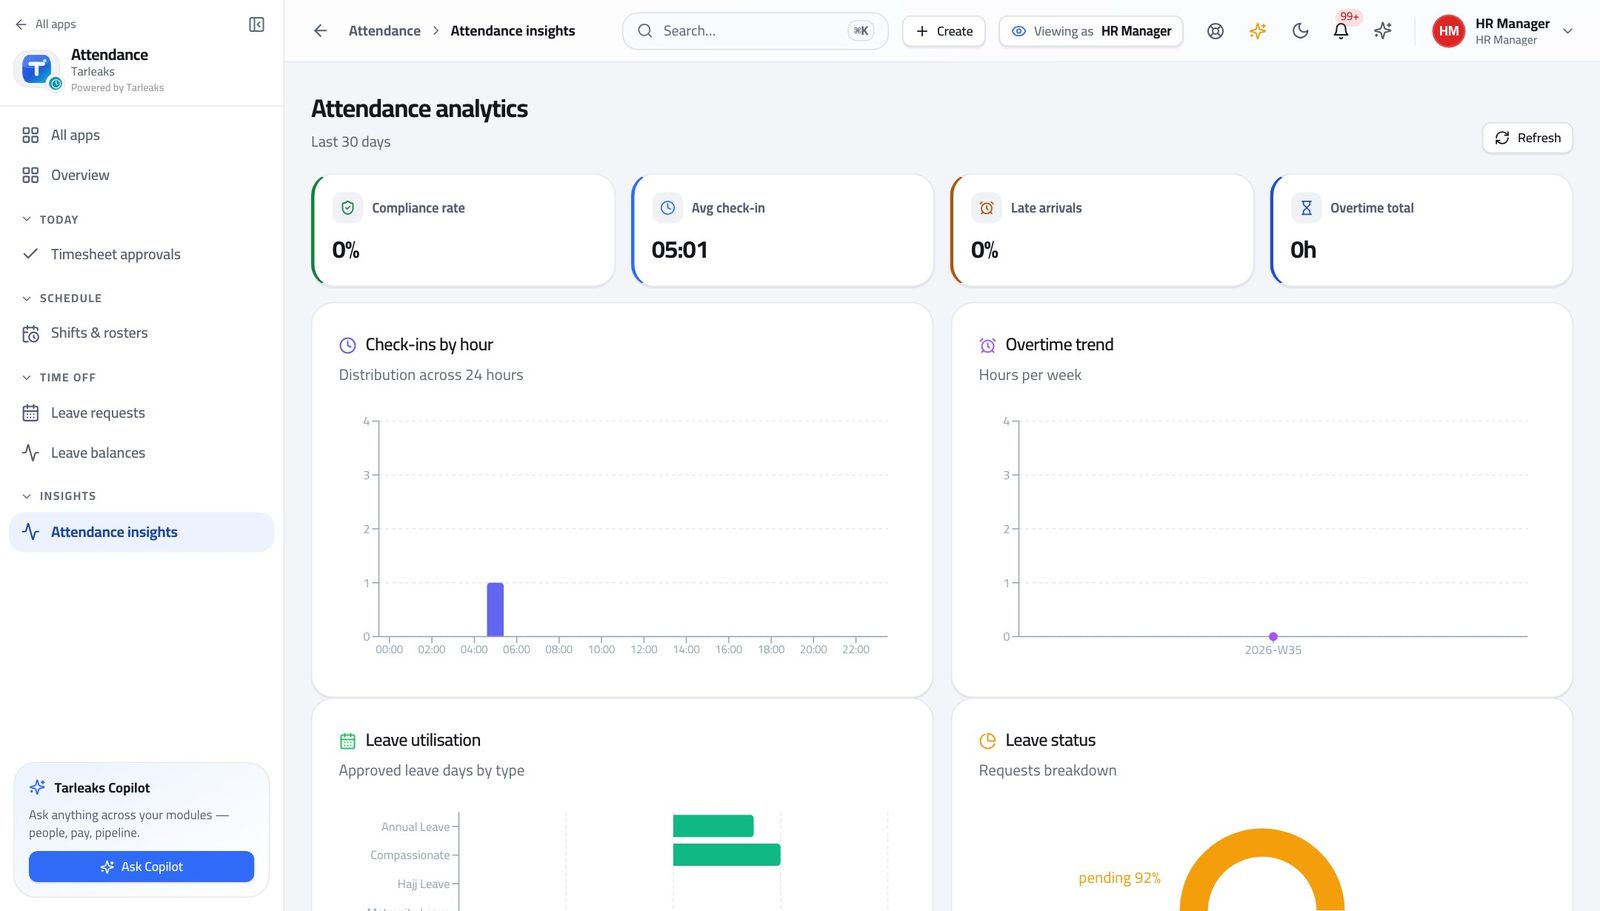
You should see Overtime by week and approved leave by type, side by side. A team that is always in overtime and never on leave is visible here months before it becomes a resignation.
Watch out Overtime is measured against the thresholds in the administrator's attendance settings. If the number looks wrong, check the threshold before you check the people.
The company's check-in rules are not yours to change #
Where Settings
- Open Settings from the launcher.
- Look down the TIME & PAY group in the left menu.
- Leave accrual policies is there. Attendance settings is not.
You should see Whether a geofence is required, which sources may clock in, the office locations and the weekend days all belong to the tenant administrator. Leave accrual policies, which IS yours, sits in the same group.
Watch out If you need one of those changed, that is a request to your administrator. It takes them a minute — and it is recorded against their name, which is why it is theirs.
Worth knowing If you need a rule changed — a new office added to the geofence, say — that is a request to your administrator, and it takes them a minute.
Use cases — the work, step by step
Each one is a sequence somebody actually performs, with the screen behind every step. Every screen here was opened in the product as this role before it was published.
monthlySet up a new working pattern, end to end #
A shift, the people on it, and the leave rule they earn under are three separate things. Doing one and forgetting the others is the most common reason a new team's numbers look wrong.
Create the shift template: name, start, end, grace, and the days it runs. One template serves everybody on that pattern.
Attendance » Shifts & rosters » New shift — verified: the control is offered; the page says “Grace minutes” Check it appears with the right hours and grace. Grace is the number every lateness argument comes down to.
Attendance » Shifts & rosters — verified: the page says “Shift templates”; 7 row(s) listed Open Assignments on the shift and put people on it from a start date. Nobody is on it until you do this.
Attendance » Shifts & rosters » Assignments — verified: the control is offered; the page says “Assignments” Make sure the leave types they can ask for are published, with their yearly entitlement.
Attendance » Leave » Leave types — verified: the page says “Leave types”; the page says “Default days per year” Write or check the accrual policy that fills their balances, then assign it. A policy assigned to nobody earns nobody anything.
Settings » Leave accrual policies » New policy — verified: the control is offered; the page says “Accrual period”
urgentThe reader was down: fix a whole day of missing punches #
The corrections write the missing records for you. What you cannot recover is people's memory of what time they arrived, so this happens today.
Confirm the scale first on Attendance Today — a day where almost nobody is present is a reader, not a team.
Attendance » Today — verified: the page says “Attendance Today”; 6 row(s) listed Tell the affected teams to raise a correction each, with the real times, today. Then open Regularizations filtered to Pending.
Attendance » Regularizations — verified: the page says “Regularizations”; 7 row(s) listed Read each one — an approved correction adds paid hours — then approve them together.
Attendance » Regularizations » Approve — verified: the page says “Approve” Check the result: the day's clock records now exist, and each one says where it came from.
Attendance » Today — verified: the page says “Attendance Today”; 6 row(s) listed
monthlyMonth end, in the order that works #
Everything payroll needs comes from an approval somebody has to make. Doing them in this order means nothing lands in a retro run.
Clear the leave queue to zero pending. Approved leave becomes paid absence on the payroll run, so it has to be decided before the cut-off.
Attendance » Leave » Approval queue — verified: the page says “Approval queue” Approve the batch you have decided on rather than one at a time. Each row still runs its own balance and overlap checks.
Attendance » Leave » tick rows » Approve — verified: the page says “Approve” Clear Regularizations. Every unapproved correction is a day somebody worked and will not be paid for.
Attendance » Regularizations — verified: the page says “Regularizations”; 7 row(s) listed Work Timesheet approvals down to nothing in Waiting on me. Approving sends the hours to payroll and to billing.
Attendance » Timesheet approvals — verified: the page says “Timesheet approvals” Finish by reading the absence and overtime views for the month, so you see what payroll is about to see.
Attendance » Attendance insights — verified: the page says “Overtime trend”
edgeExplain a leave balance somebody disagrees with #
The balance is never a typed number — it is the sum of a rule and a ledger. Showing both ends the disagreement in one conversation.
Start with the entitlement on the leave type. Half of these conversations are somebody quoting the yearly entitlement and meaning their accrued balance.
Attendance » Leave » Leave types — verified: the page says “Leave types”; the page says “Default days per year” Open the accrual policy behind it: the rate, how often it accrues, the cap, the carry-over and its expiry. Read it out loud.
Settings » Leave accrual policies — verified: the page says “Leave accrual policies”; 2 row(s) listed If they have no balance at all, check Assign on the policy — somebody who was never assigned earns nothing, silently.
Settings » Leave accrual policies — verified: the page says “Leave accrual policies”; 2 row(s) listed
This sign-in has no working day of its own — there is no Check in button and no New request button on it. And whether the company needs a geofence to clock in is the administrator's decision, not yours. Both are deliberate: the person who decides on everybody's time should not also be quietly setting the rules they are judged against.