Inventory role guides — what each role can do, step by step
Step-by-step guides for buying and stock — the buyer who raises purchase orders, the warehouse that receives against them, and the manager who approves, closes and posts landed costs. 25 steps across 4 roles, every one of them carried out in the product before it was published here.
Last updated
Nothing matches that. Try a shorter word, or pick All roles to search every guide.
Go deeper
Buyer
Raise the order in a minute, from names — and let the reorder queue raise the routine ones.
Raises purchase orders by picking a supplier and items, sends them, and drafts them straight from the reorder queue. Reads stock and suppliers; never receives, approves or posts landed costs.
What you will be able to do
- Create a purchase order by picking the supplier and the items
- Send it, and follow it to received, billed and paid
- Read who changed an order, and what the freight added
- Draft the routine orders from the reorder queue
What this role can and cannot do
| Can | Cannot |
|---|---|
|
|
6 steps, each one carried out in the product on .
Open the purchase orders #
Where Inventory » Purchase orders
- Open Inventory, then Purchase orders.
- Read the tiles: open, awaiting goods, received not billed, drafts. Click one — it filters the list and the filter stays in the address bar.
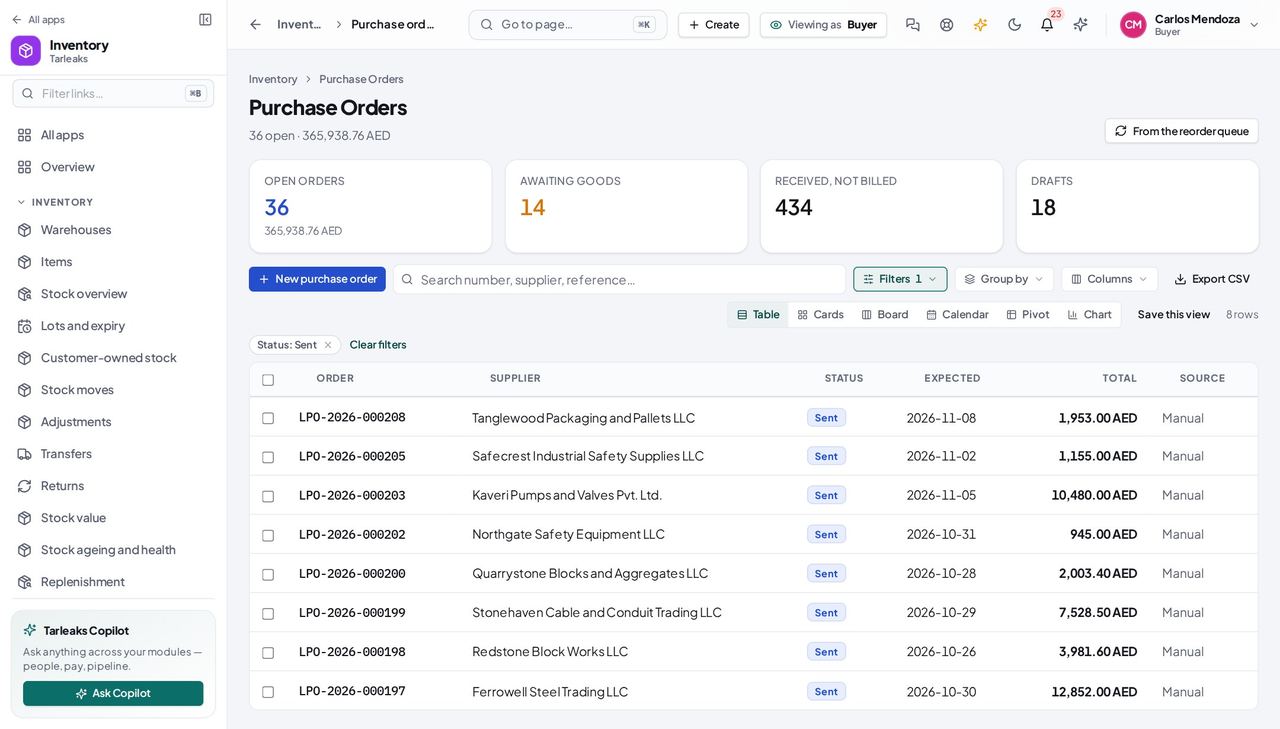
You should see The orders with their supplier, status and total (here the Awaiting goods filter).
No Receive goods for the buyer #
Where Inventory » Purchase orders » an order
- Open a sent order.
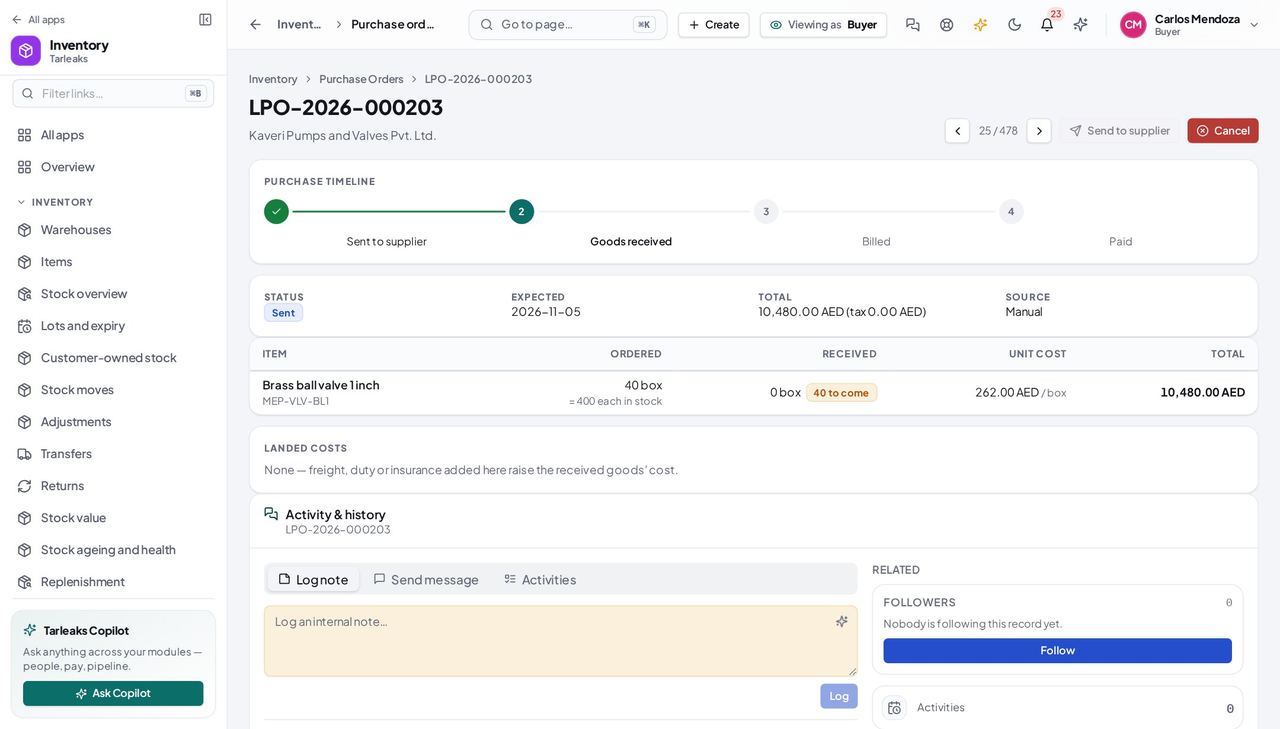
You should see The actions row has Send and Cancel — not Receive goods.
Raise and send an order #
Where Inventory » Purchase orders » New purchase order
- Open your company's address in the browser — it looks like yourcompany.tarleaks.com.
- Type the e-mail address your administrator set up for you, then your password.
- You land on the app launcher. Click the Inventory tile.
- Purchase orders, New purchase order.
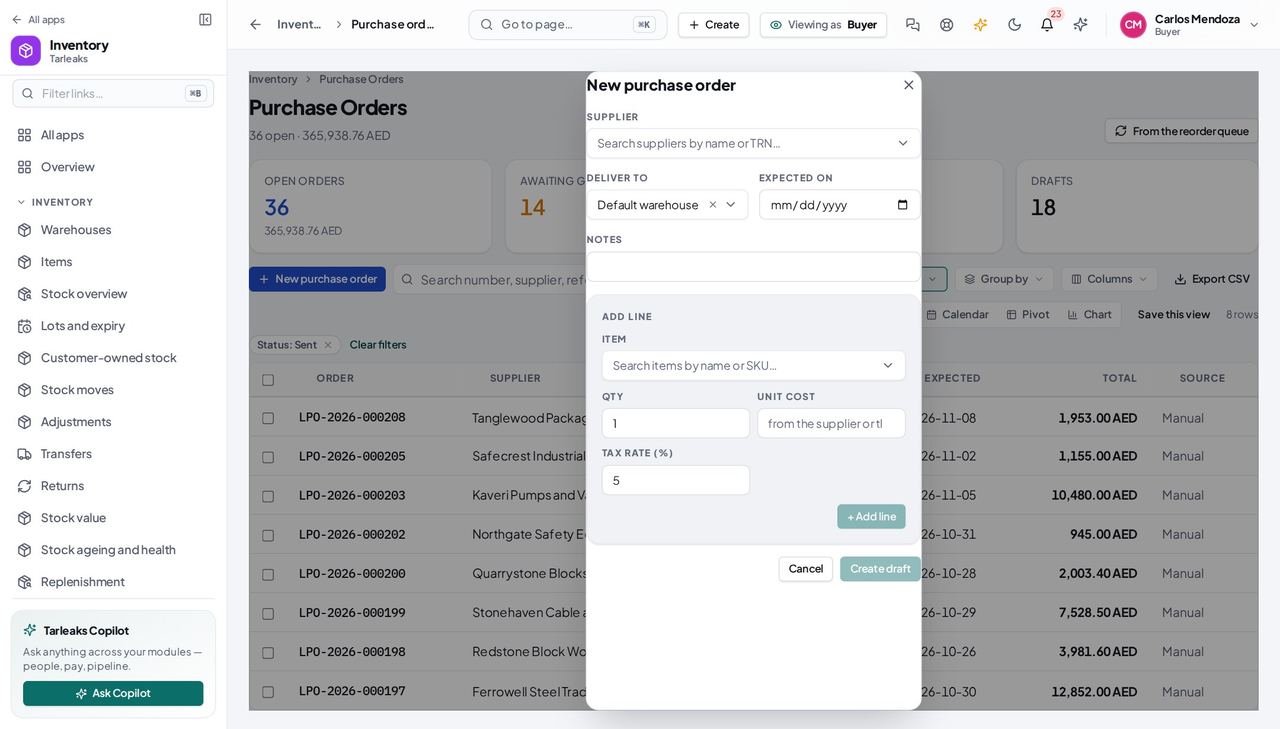
- Supplier, items, Create draft, Send to supplier.
| Field | What to put in it |
|---|---|
| Supplier | the supplier's name or TRN — never an id |
| Deliver to | the warehouse the goods go to |
| Item | the catalogue name or SKU |
| Qty | how many, in the item's unit |
| Unit cost | filled from the item; type the supplier's quote over it |
You should see The timeline's Sent step fills in; the order reads Sent.
Watch out Above the company's approval threshold, Send is refused until the manager approves.
Read what changed on an order, and who did it #
Where Inventory » Purchase orders » an order » Activity & history
- Open your company's address in the browser — it looks like yourcompany.tarleaks.com.
- Type the e-mail address your administrator set up for you, then your password.
- You land on the app launcher. Click the Inventory tile.
- Purchase orders, an order.
- Scroll to Activity & history and press Logged changes.
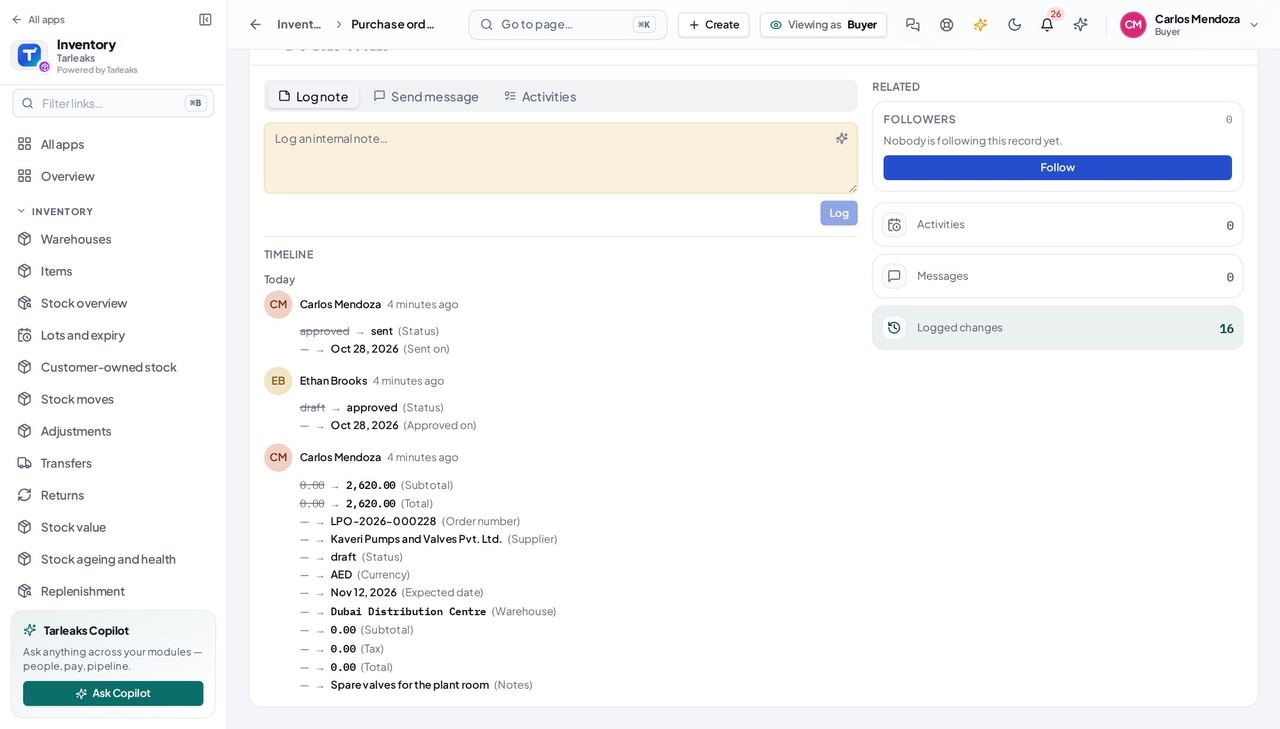
You should see Lines such as Status: approved → sent, each under the person who made the change.
Watch out The history is the same whoever opens the order; a buyer reads it, only people who may edit the order add notes.
Worth knowing You read the history; posting a note is for people who may edit the order.
See the landed costs on a received order #
Where Inventory » Purchase orders » a received order » Landed costs
- Open a received order and read the Landed costs panel under the lines.
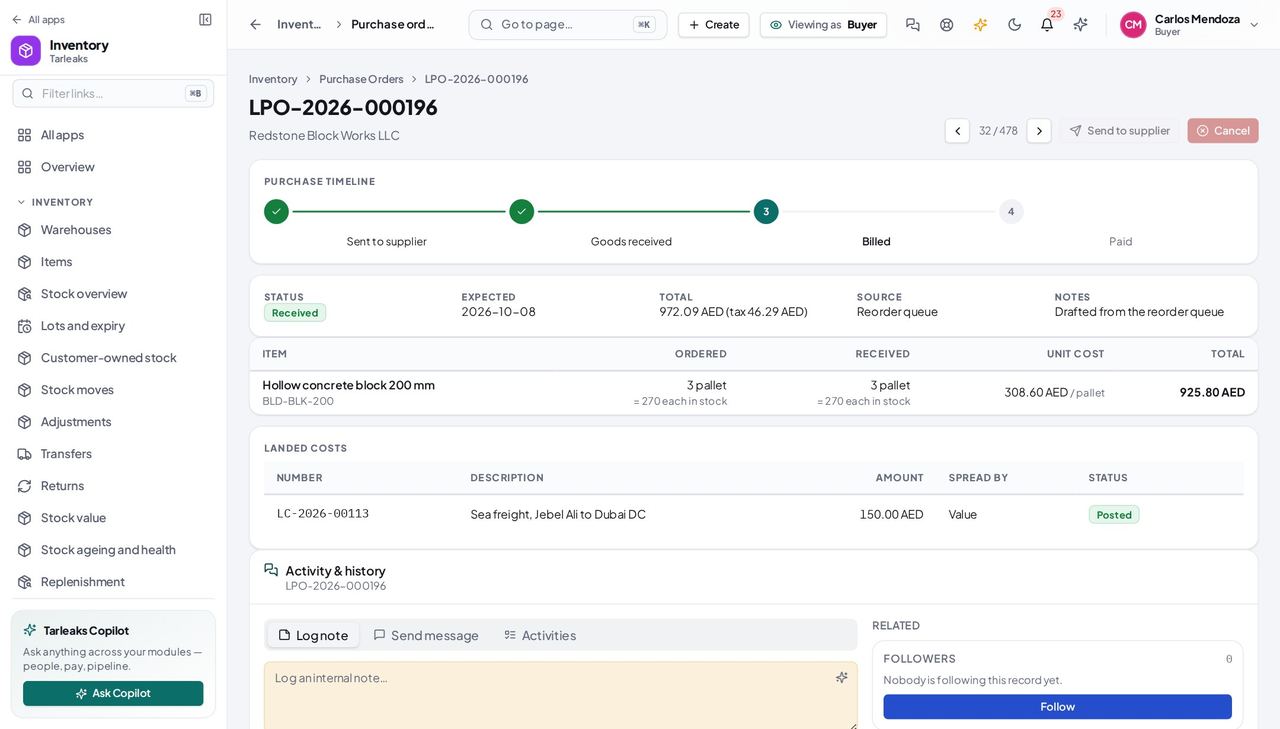
You should see Each landed cost with its number, what it was for, the amount, how it was spread and whether it is posted. There is no Landed cost button: the inventory manager adds those.
Name the budget account on an order line #
Where Inventory » Purchase orders » New purchase order
- Press New purchase order and pick the supplier.
- Pick the item; under it, type the Expense account code — left empty, the item's default account is used.
- Type another code if this purchase belongs to a different budget, then Add line.
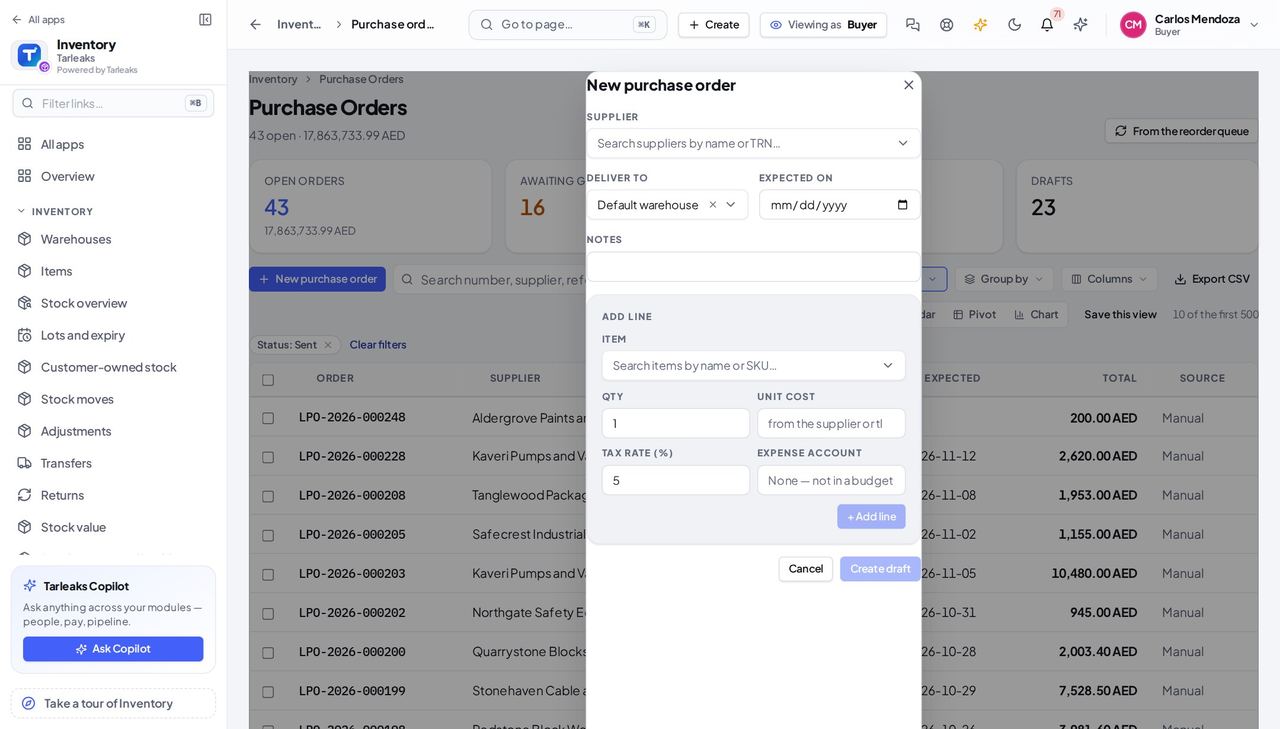
You should see The draft's lines show an Account column; the order page shows it too (None when no account is set).
Worth knowing The budget counts the order from the moment it exists, draft included, until its supplier bill posts.
Use cases — the work, step by step
Each one is a sequence somebody actually performs, with the screen behind every step. Every screen here was opened in the product as this role before it was published.
weeklyMonday: the reorder queue #
The queue drafts the routine orders; you review, adjust, send.
Open Replenishment and press Draft purchase orders.
Inventory » Purchase orders — verified: the page says “Purchase Orders”; 8 row(s) listed; no “verify” anywhere on the page; no “Network error” anywhere on the page Open each draft: check the supplier and the quantities, fix the cost where the supplier quoted differently.
Inventory » Purchase orders » New purchase order — verified: the control is offered; the control is offered; no “verify” anywhere on the page; no “Network error” anywhere on the page Send to supplier. The order reads Sent; the warehouse sees it on its list.
Inventory » Purchase orders » New purchase order — verified: the control is offered; the control is offered; no “verify” anywhere on the page; no “Network error” anywhere on the page
urgentA confirmed sale we cannot cover #
The shortfall drafted an order by itself — your job is the supplier and the date.
Open Purchase orders, Drafts: the order named Backorder · SO-… holds the shortfall.
Inventory » Purchase orders — verified: the page says “Purchase Orders”; 8 row(s) listed; no “verify” anywhere on the page; no “Network error” anywhere on the page Pick the supplier if none, set the expected date, send.
Inventory » Purchase orders » New purchase order — verified: the control is offered; the control is offered; no “verify” anywhere on the page; no “Network error” anywhere on the page
when a total or a date looks wrongWho changed this order? #
The order's history answers it without asking around: field, old value, new value, person, time.
Open the order and scroll to Activity & history.
Inventory » Purchase orders » an order » Activity & history — verified: the page says “Logged changes”; the page says “(Status)”; the page says “(Order number)”; no “partially_received” anywhere on the page; no “verify” anywhere on the page; no “Network error” anywhere on the page Press Logged changes and read down: the status moves, and who approved and who sent.
Inventory » Purchase orders » an order » Activity & history — verified: the page says “Logged changes”; the page says “(Status)”; the page says “(Order number)”; no “partially_received” anywhere on the page; no “verify” anywhere on the page; no “Network error” anywhere on the page Check the Landed costs panel for freight added after receipt.
Inventory » Purchase orders » a received order » Landed costs — verified: the page says “Landed costs”; the page says “Posted”; the action is not offered to this role; no “verify” anywhere on the page; no “Network error” anywhere on the page
Receiving, approving and landed costs are other people's — the buttons are simply not there for you.
Warehouse User
See what is coming, receive it against the order, and the stock is valued right.
Receives goods against a sent purchase order, line by line, and sees the stock arrive at the order's cost. Never raises or sends an order.
What you will be able to do
- Read the sent orders
- Receive goods line by line, never more than is outstanding
- Count a shelf, or a blind count that shows only what you counted
- Write damaged stock off from its lot
- Send goods back to the supplier
What this role can and cannot do
| Can | Cannot |
|---|---|
|
|
11 steps, each one carried out in the product on .
Open the orders awaiting goods #
Where Inventory » Purchase orders » Awaiting goods
- Open Purchase orders and click the Awaiting goods tile.
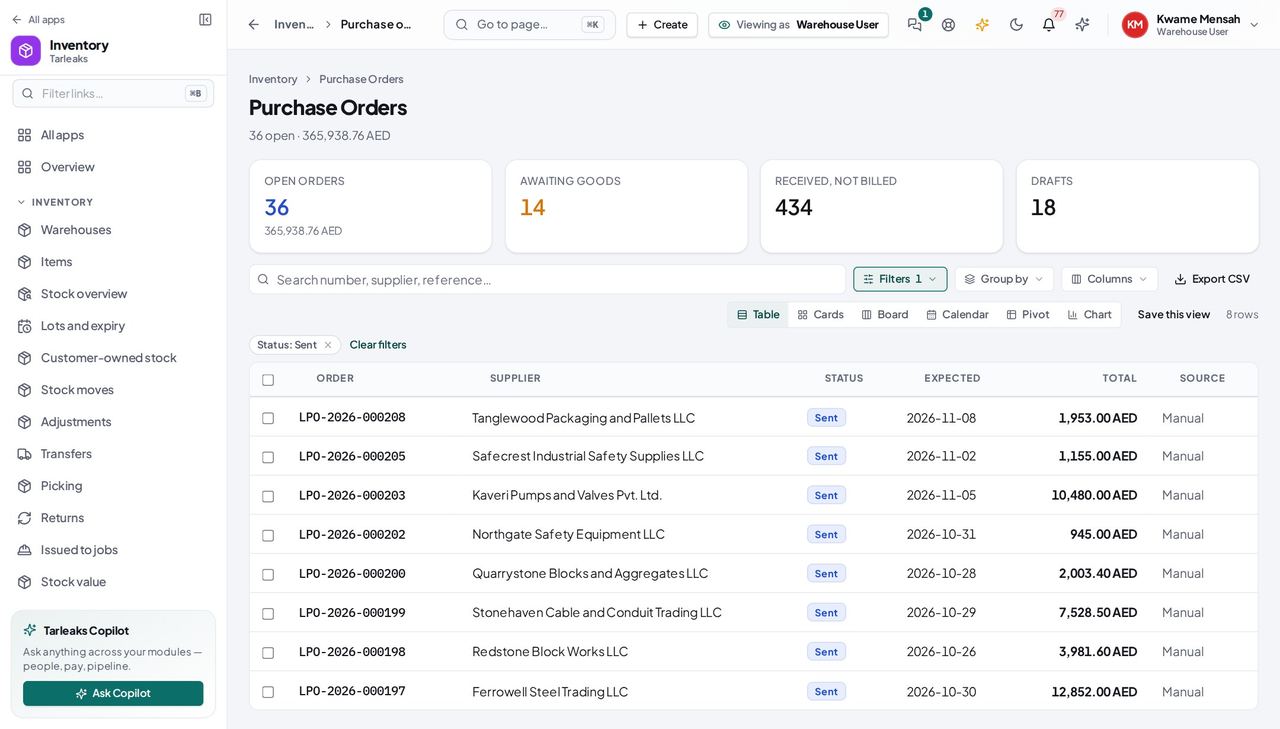
You should see The sent orders — your receiving list.
Receive against an order #
Where Inventory » Purchase orders » the order » Receive goods
- Open your company's address in the browser — it looks like yourcompany.tarleaks.com.
- Type the e-mail address your administrator set up for you, then your password.
- You land on the app launcher. Click the Inventory tile.
- Purchase orders, the sent order, Receive goods.
- Quantities, delivery note, Post receipt.
| Field | What to put in it |
|---|---|
| Delivery note | the number on the supplier's note |
| Arrived on | today, or the earlier day the truck came (the supplier is judged on it) |
| Into location | the shelf, or Warehouse default |
| Receiving now | what arrived, in the unit you pick next to it |
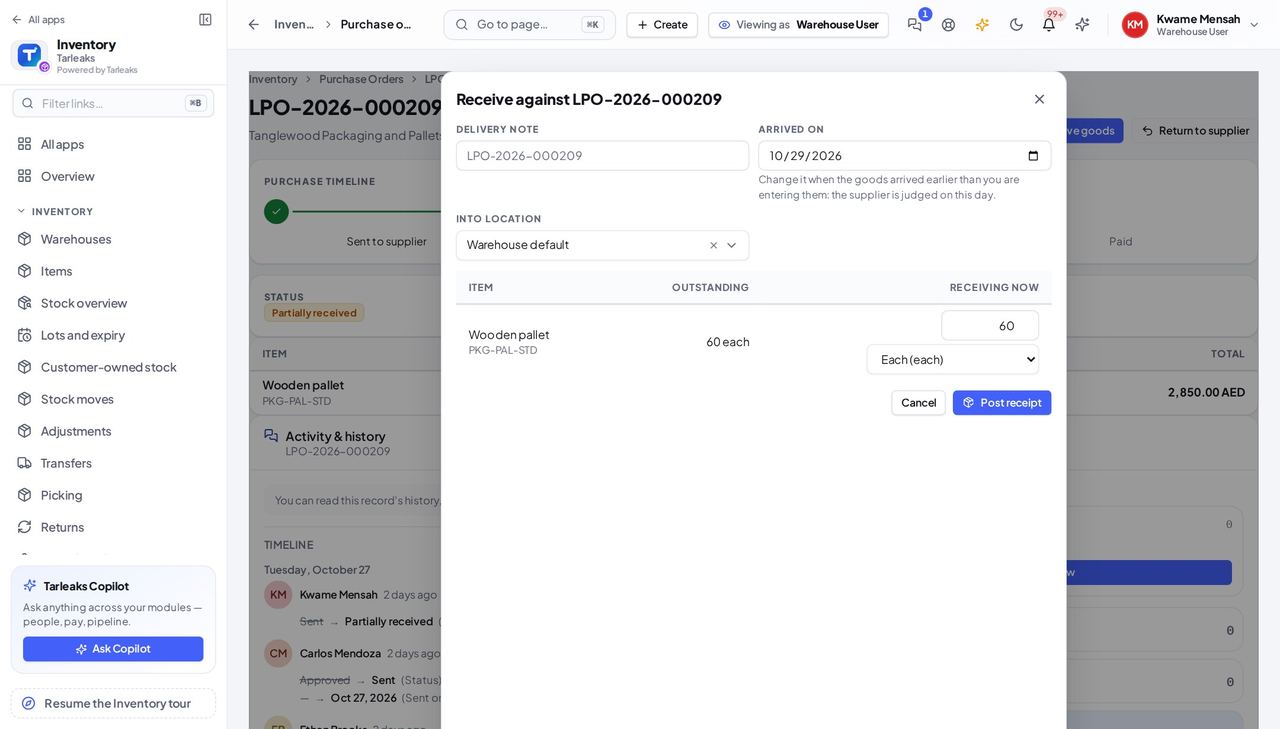
You should see The order reads Partially received or Received; the stock is in at the order's cost.
Watch out The last receipt turns the order Received; accounting matches the supplier's bill against it.
A receipt cannot be bigger than the order #
Where Inventory » Purchase orders » the order » Receive goods
- In Receive goods type more than is outstanding.
- A red message says how many lines are above the outstanding quantity, and Post receipt stays off. Type the outstanding amount, or ask the buyer to edit the order.
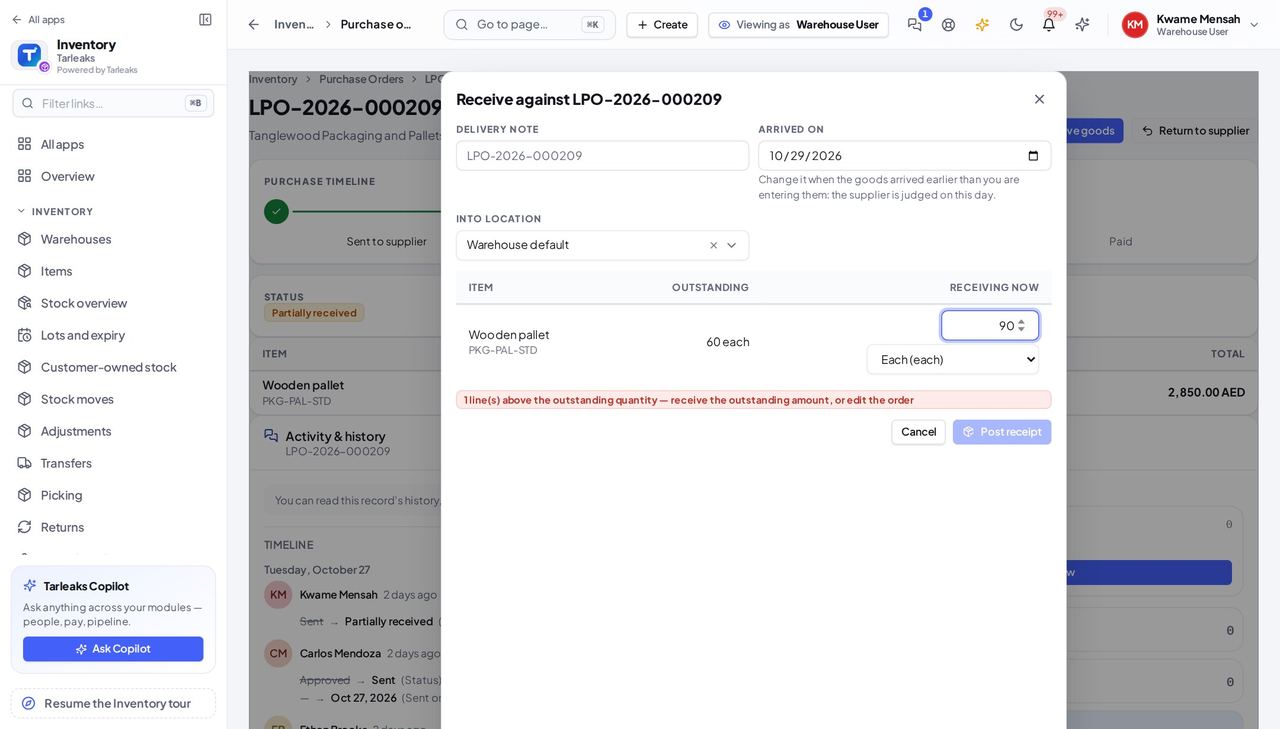
You should see The red message, and a Post receipt button that does not respond.
Worth knowing Two people receiving the same order at the same moment cannot take it past what was ordered either: the second is refused in the same words.
Count a shelf #
Where Inventory » Adjustments » a count » Open the count sheet
- Open Adjustments, click the count, and press Open the count sheet.
- Type what is on the shelf against each line (Enter goes to the next line), or scan a barcode into the scan box.
- The difference and its value show before anything is posted.
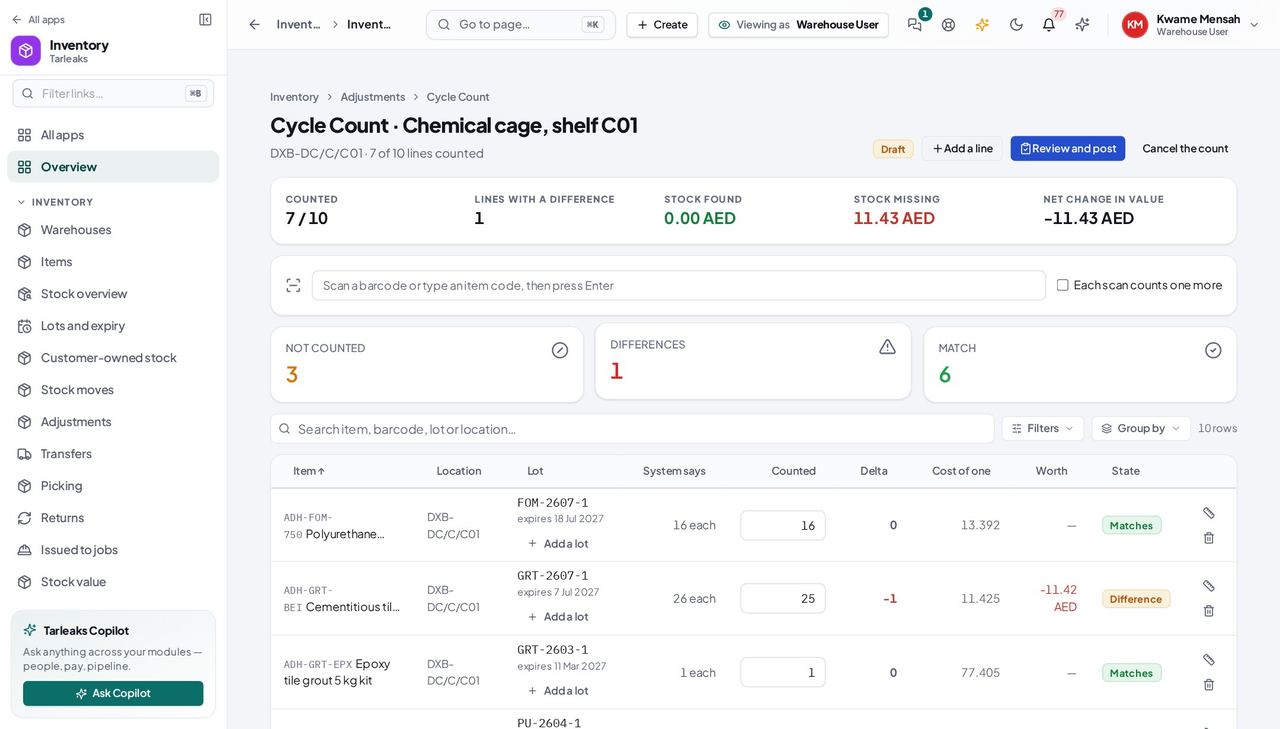
You should see Lines with a difference are marked; lines nobody counted are left alone.
A blind count shows you only what you counted #
Where Inventory » Adjustments » a blind count » Open the count sheet
- Open a count your supervisor started blind.
- The sheet has Item, Location, Lot and Counted — no system quantity, no difference, no value and no Review and post. Count what you see.
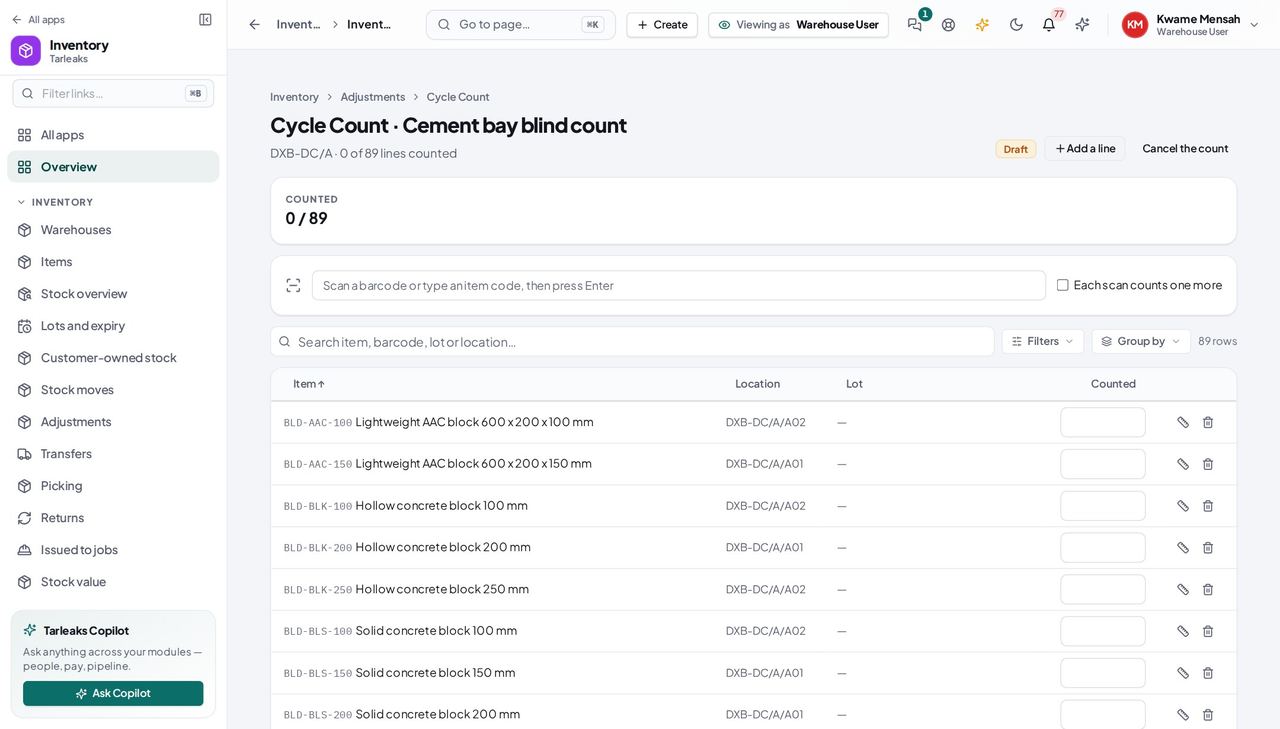
You should see A sheet with nothing to compare your count against, on purpose.
Worth knowing A count is started blind from the mobile app; the web shows it as the counter sees it.
Write off damaged stock from its lot #
Where Inventory » Adjustments » New count » Write-off
- Open your company's address in the browser — it looks like yourcompany.tarleaks.com.
- Type the e-mail address your administrator set up for you, then your password.
- You land on the app launcher. Click the Inventory tile.
- Adjustments, New count.
- What is this for: Write-off. Start the count.
- Click it in the list; Add a line.
| Field | What to put in it |
|---|---|
| Item | the catalogue name or SKU |
| Location | the shelf the damaged stock is on |
| Lot | the batch it came from (for items tracked by lot) |
| Left on the shelf | what is left AFTER the write-off, not the amount written off |
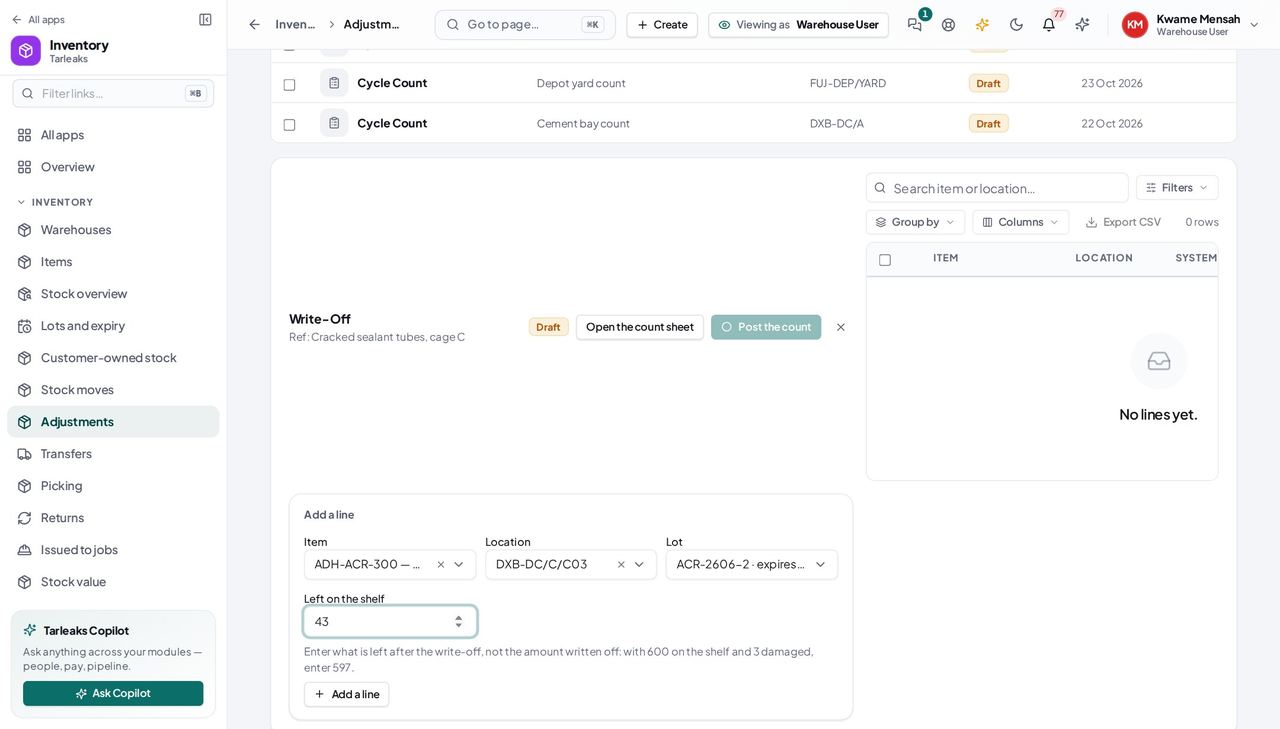
You should see The line shows the quantity leaving that lot; Post the count books it.
Watch out Posting the count books the loss to accounting and takes the quantity out of that lot.
A write-off can never add stock #
Where Inventory » Adjustments » a write-off » Add a line
- On a write-off line, type a quantity larger than the lot holds.
- The line is refused and the message gives the figure to stay under. To add stock, start a Found stock count instead.
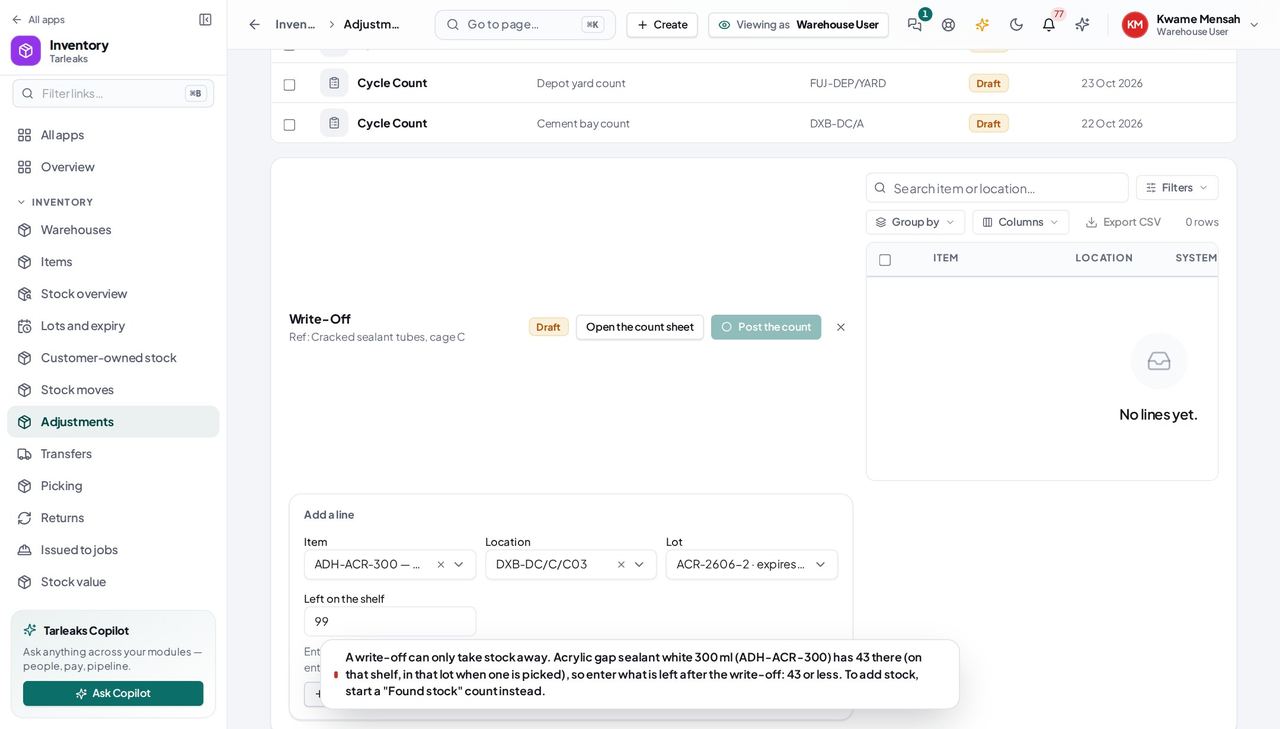
You should see The message ends with the highest quantity you may type.
Send goods back to the supplier #
Where Inventory » Purchase orders » the order » Return to supplier
- Open an order that has received goods and press Return to supplier.
- Give the reason the supplier needs, then type the quantity going back against each receipt line; Record the return.
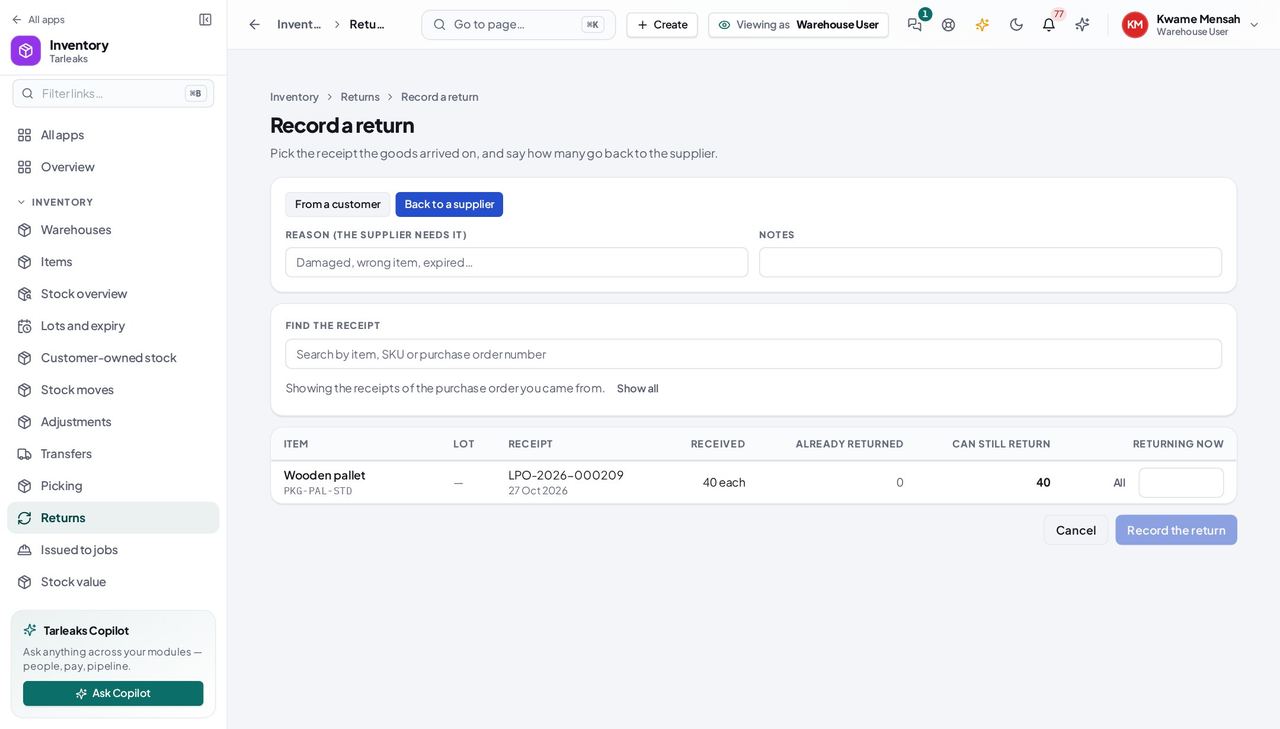
You should see The page lists the order's own receipts with what can still go back.
See the goods on the road #
Where Inventory » Valuation » By warehouse
- Open Valuation and choose By warehouse.
- Under the warehouses, the On the road line gives the units and value sent and not yet received.
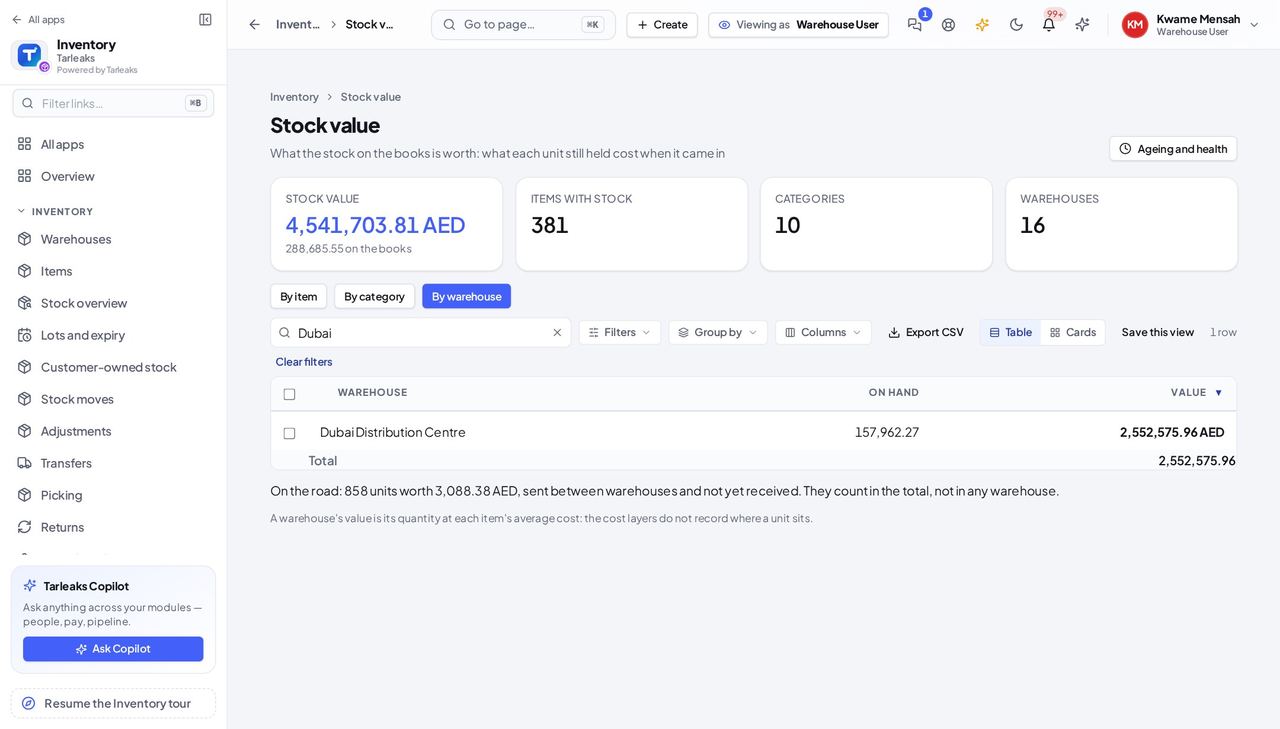
You should see Goods in transit count in the total stock value but in no warehouse, so nothing is counted twice.
Worth knowing Click the line to open those transfers.
Read the count rules #
Where Inventory » Adjustments » Count rules
- Open Adjustments and press Count rules.
- Read the tolerances and the reasons for a stock difference your company uses.
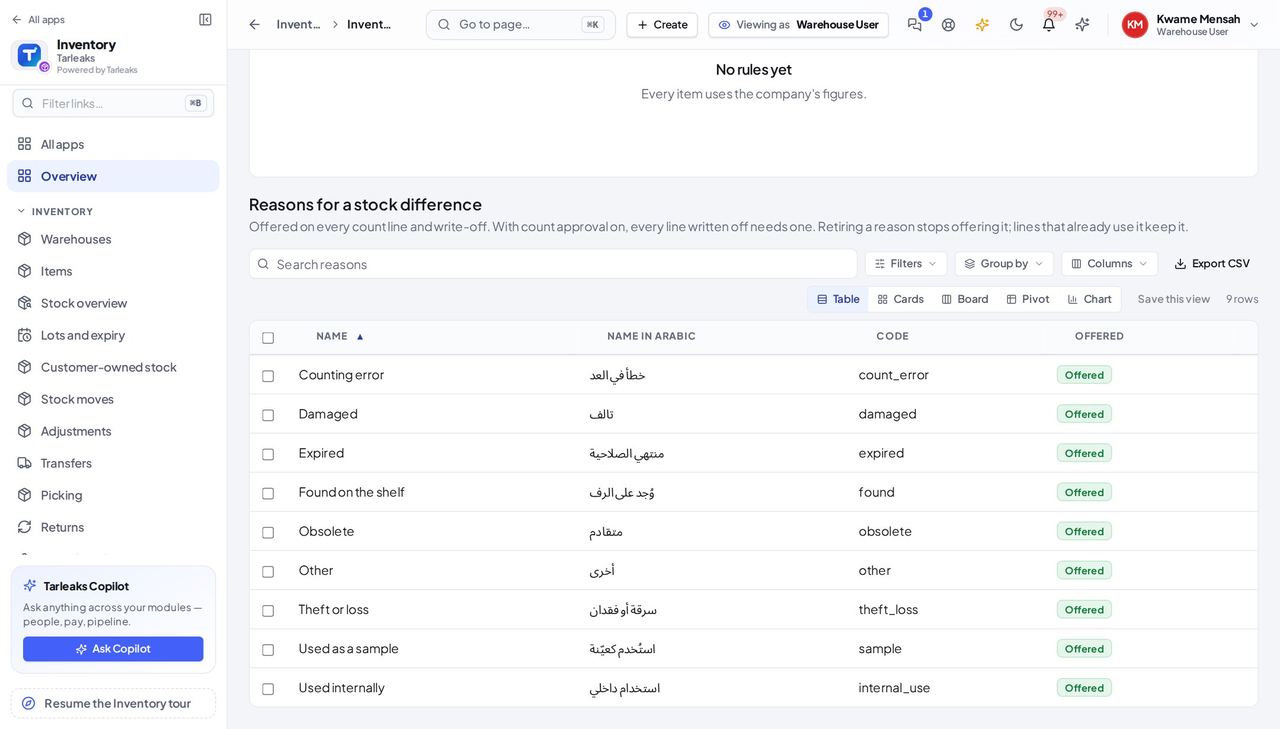
You should see The rules are there to read; New rule and New reason are the manager's.
Give a difference a reason #
Where Inventory » Adjustments » a count » Open the count sheet
- Open the count sheet as for any count.
- In the Reason column, pick why the shelf differs: Damaged, Expired, Theft or loss, Counting error…
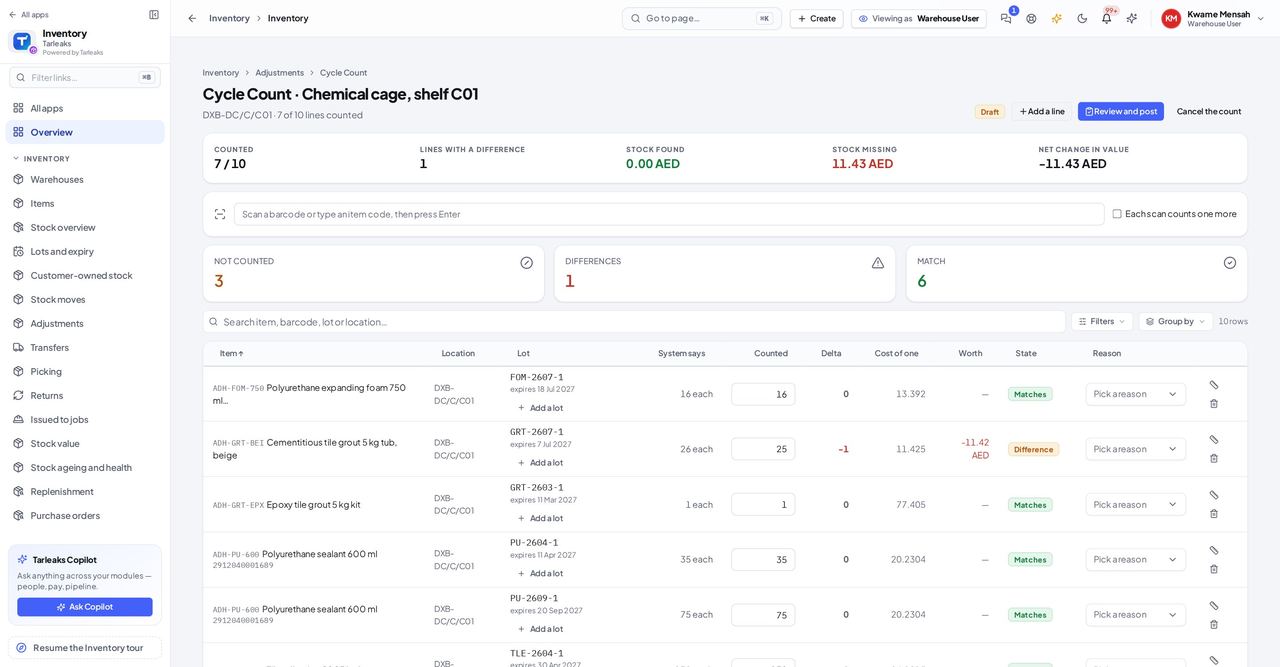
You should see The reasons come from your company's list. Once Count approval is on, a write-off cannot post without them.
Use cases — the work, step by step
Each one is a sequence somebody actually performs, with the screen behind every step. Every screen here was opened in the product as this role before it was published.
dailyA truck arrives #
Receiving against the order is what values the stock and what lets accounts pay.
Open Purchase orders, Awaiting goods; find the order on the delivery note.
Inventory » Purchase orders » Awaiting goods — verified: the page says “Purchase Orders”; 8 row(s) listed; no “verify” anywhere on the page; no “Network error” anywhere on the page Receive goods: keep the outstanding quantities unless the box says otherwise; enter the note number; Post receipt.
Inventory » Purchase orders » the order » Receive goods — verified: the page says “Post receipt”; the page says “Arrived on”; the control is offered; no “partially_received” anywhere on the page; the control is offered; no “verify” anywhere on the page; no “Network error” anywhere on the page More boxes than the order? Do not type them: the red message stops you, and the buyer edits the order.
Inventory » Purchase orders » the order » Receive goods — verified: the page says “above the outstanding quantity”; the control is offered; no “partially_received” anywhere on the page; the control is offered; no “verify” anywhere on the page; no “Network error” anywhere on the page
monthly, or when a supervisor asksCount a shelf #
A count compares the shelf with the system and books only the differences you confirm.
Open Adjustments, click the count, and Open the count sheet.
Inventory » Adjustments » a count » Open the count sheet — verified: the control is offered; the page says “Chemical cage, shelf C01”; the page says “System says”; no “verify” anywhere on the page; no “Network error” anywhere on the page A blind count is the same sheet without the system figures: count what you see and leave the rest to the supervisor.
Inventory » Adjustments » a blind count » Open the count sheet — verified: the page says “Cement bay blind count”; the control is offered; the action is not offered to this role; the action is not offered to this role; no “verify” anywhere on the page; no “Network error” anywhere on the page
as they are foundDamaged goods #
A write-off takes the quantity out of the lot it came from, and cannot be used to add stock.
Start a Write-off, add the line with the item, shelf and lot, and type what is left.
Inventory » Adjustments » New count » Write-off — verified: the page says “Left on the shelf”; the page says “ACR-2606-2”; the page says “with 600 on the shelf and 3 damaged”; no “verify” anywhere on the page; no “Network error” anywhere on the page If the message says a write-off can only take stock away, the number is above what the lot holds: re-check the lot and what is left.
Inventory » Adjustments » a write-off » Add a line — verified: the page says “A write-off can only take stock away”; no “verify” anywhere on the page; no “Network error” anywhere on the page Goods that arrived damaged and are still on an order go back instead: Return to supplier.
Inventory » Purchase orders » the order » Return to supplier — verified: the page says “Record a return”; the page says “Back to a supplier”; the page says “LPO-2026-000209”; no “verify” anywhere on the page; no “Network error” anywhere on the page
You never raise or send an order, and you never see a blind count's figures.
Inventory Manager
Approve what is big, close what is done, and land the freight on the goods.
Approves an order above the threshold, closes it, posts the landed cost that raises the received goods' value — and can do everything the buyer and the warehouse do.
What you will be able to do
- Approve an order above the threshold
- Close an order
- Add and post a landed cost
- Read a blind count's difference and post it
- Draft orders from the reorder queue
What this role can and cannot do
| Can | Cannot |
|---|---|
|
|
7 steps, each one carried out in the product on .
Approve an order above the threshold #
Where Inventory » Purchase orders » a draft » Approve
- Open a draft; if its total is above the company's threshold, Send is refused until you press Approve.
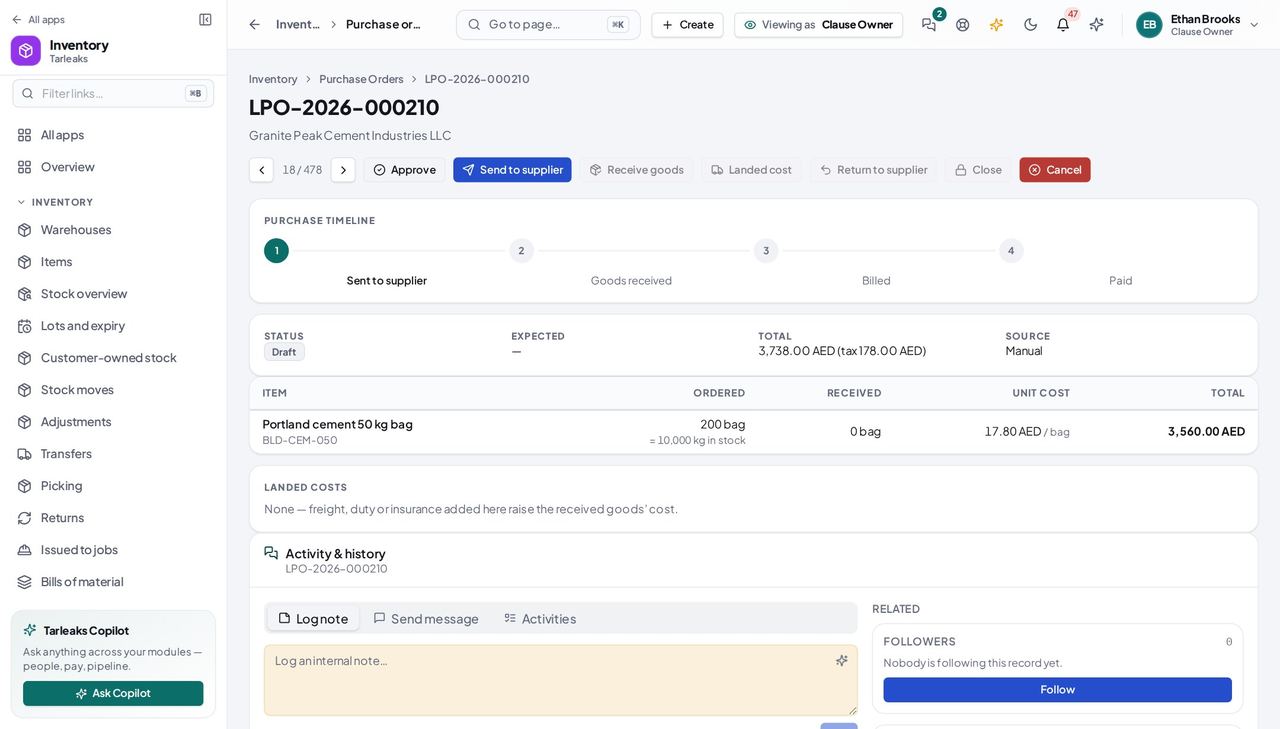
You should see The order reads Approved and the buyer can send it.
Add the freight to what the goods cost #
Where Inventory » Purchase orders » a received order » Landed cost
- Open your company's address in the browser — it looks like yourcompany.tarleaks.com.
- Type the e-mail address your administrator set up for you, then your password.
- You land on the app launcher. Click the Inventory tile.
- Purchase orders, a received order, Landed cost.
| Field | What to put in it |
|---|---|
| Amount | in the order's currency |
| Description | what it is (sea freight, customs duty…) |
| Spread by | value, quantity or weight; the company default otherwise |
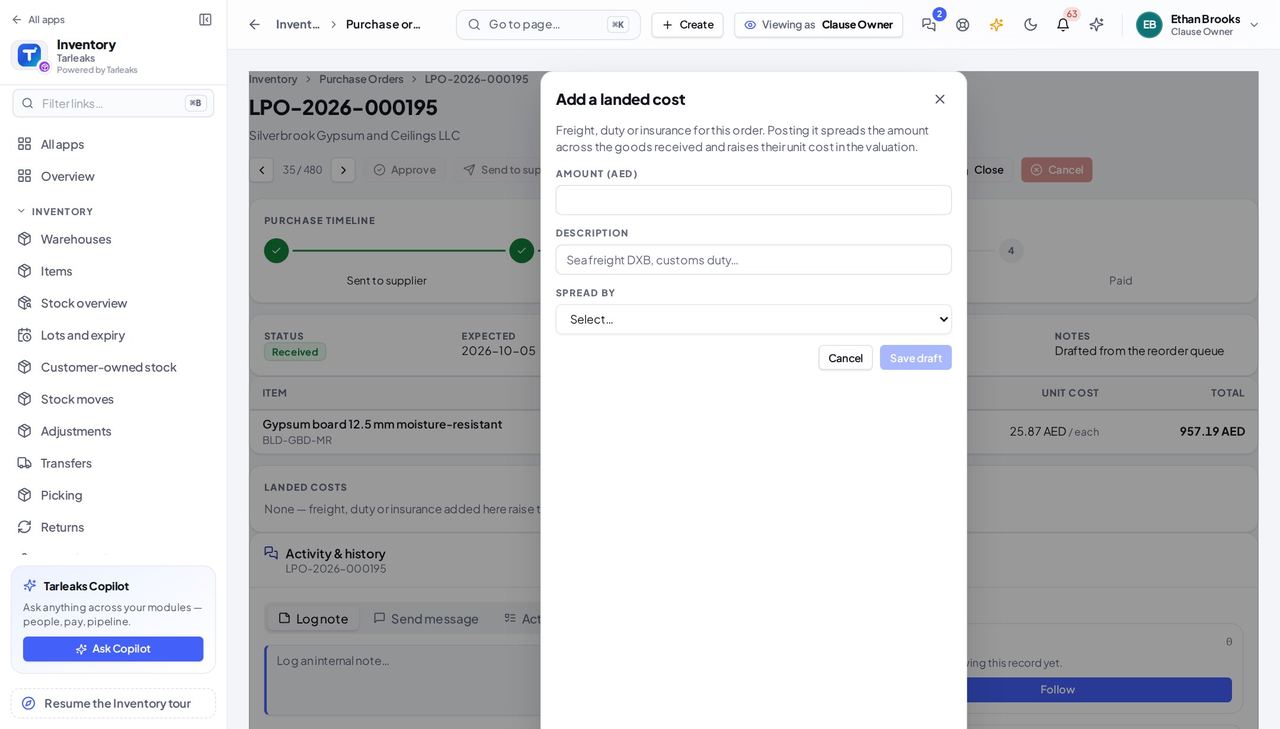
You should see The draft appears under Landed costs with a Post button.
Watch out A landed cost in another currency than the company's is converted at the rate of the day it is posted.
Post it, and the order shows it as posted #
Where Inventory » Purchase orders » a received order » Landed costs
- Press Post on the draft landed cost.
- The row reads Posted. The amount is spread over the goods received and their unit cost rises by their share.
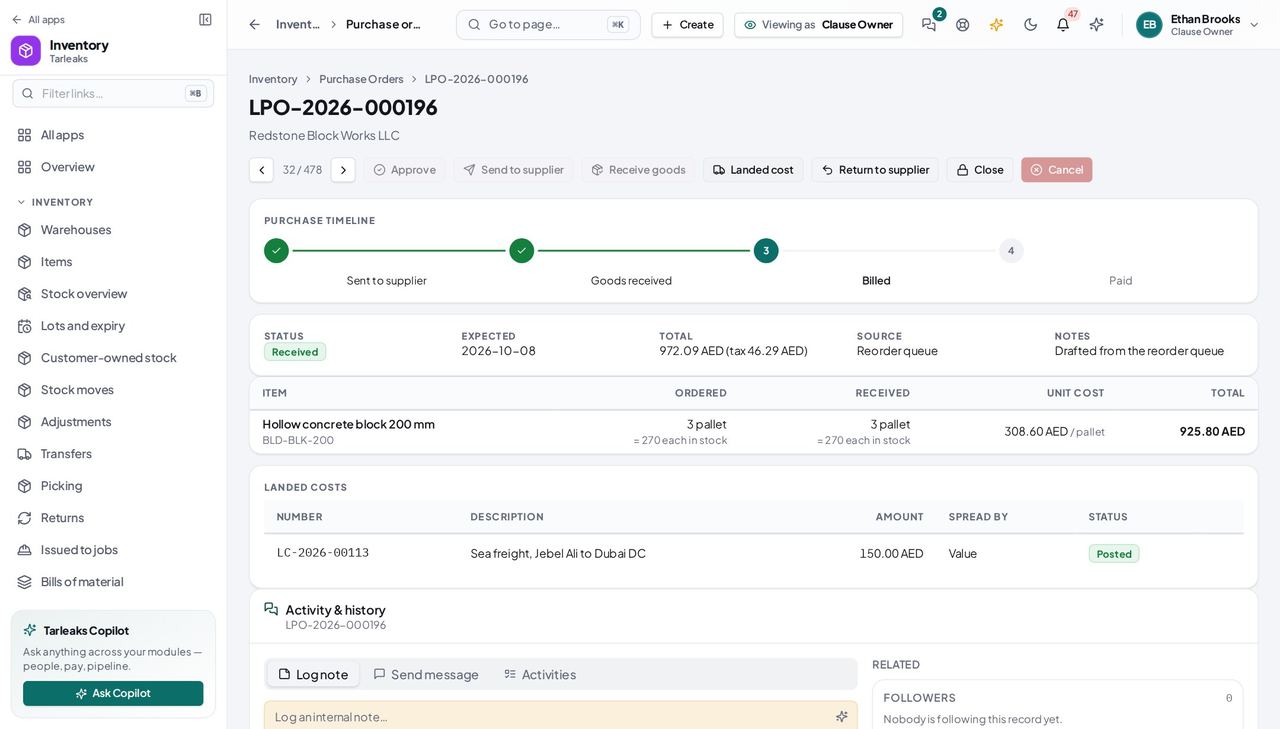
You should see The landed cost with its number, amount and the word Posted.
A blind count: you see the difference and you post it #
Where Inventory » Adjustments » a blind count » Open the count sheet
- Open the blind count the counter is working on.
- You see System says, Delta, Cost of one and Worth, and Review and post — the counter sees none of them.
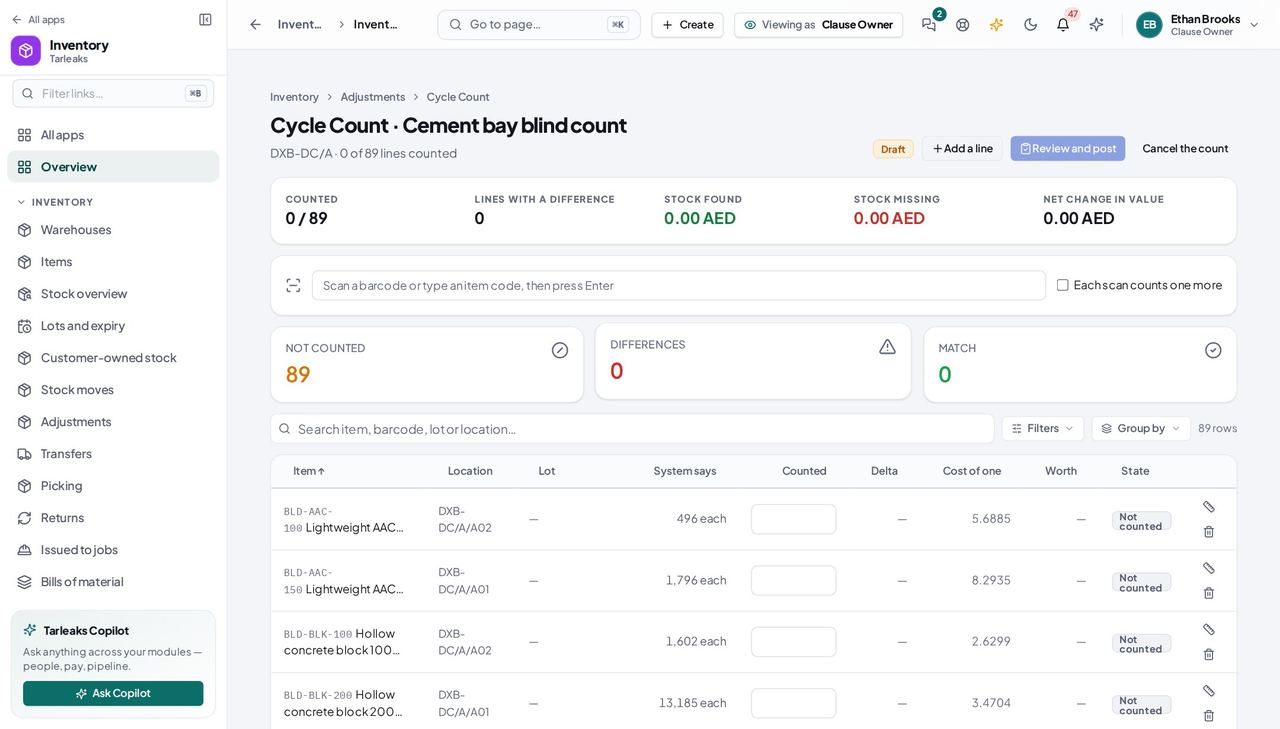
You should see The columns the counter does not have.
See what is on the road between warehouses #
Where Inventory » Valuation » By warehouse
- Open Valuation and choose By warehouse.
- Read the On the road line under the warehouses.
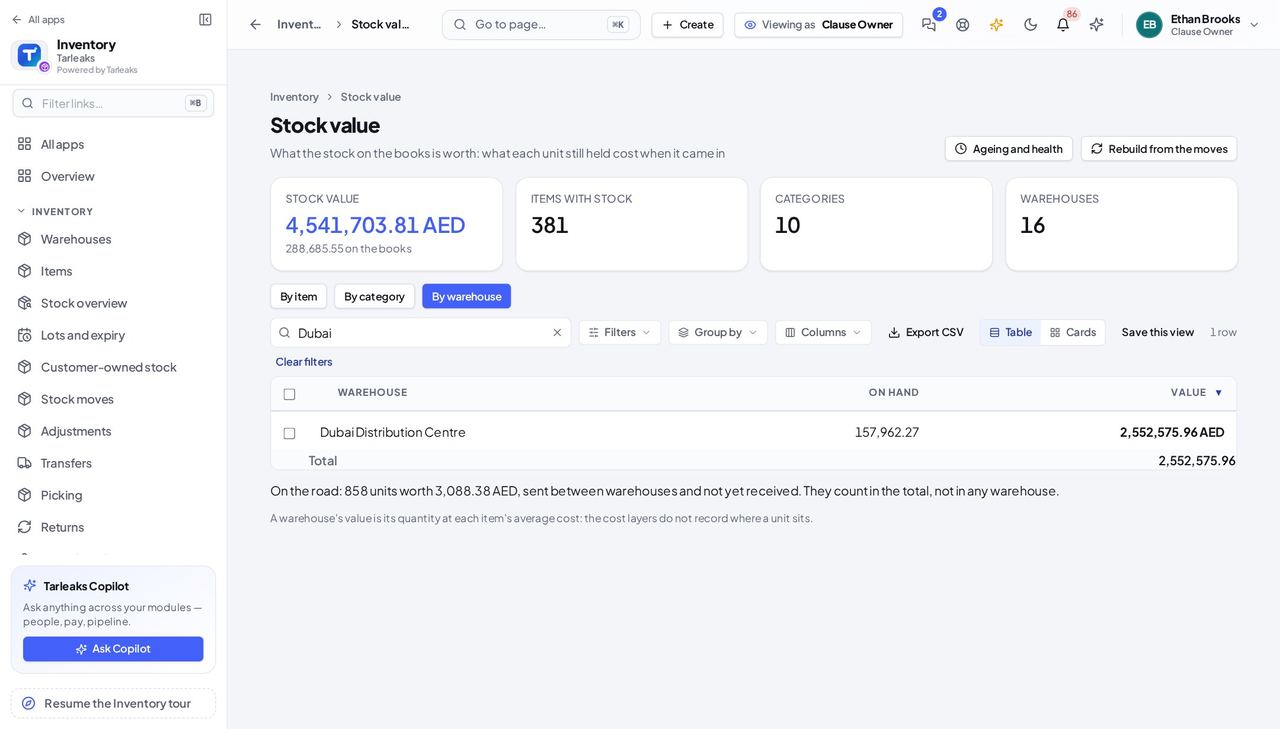
You should see The units and value sent between warehouses and not yet received; they count in the total, not in any warehouse.
Worth knowing Click the line to open the shipped and partly received transfers.
Give an item its default expense account #
Where Inventory » Items » New item
- Open Items and press New item (or edit an item).
- Type the Default expense account code the item is usually bought for.
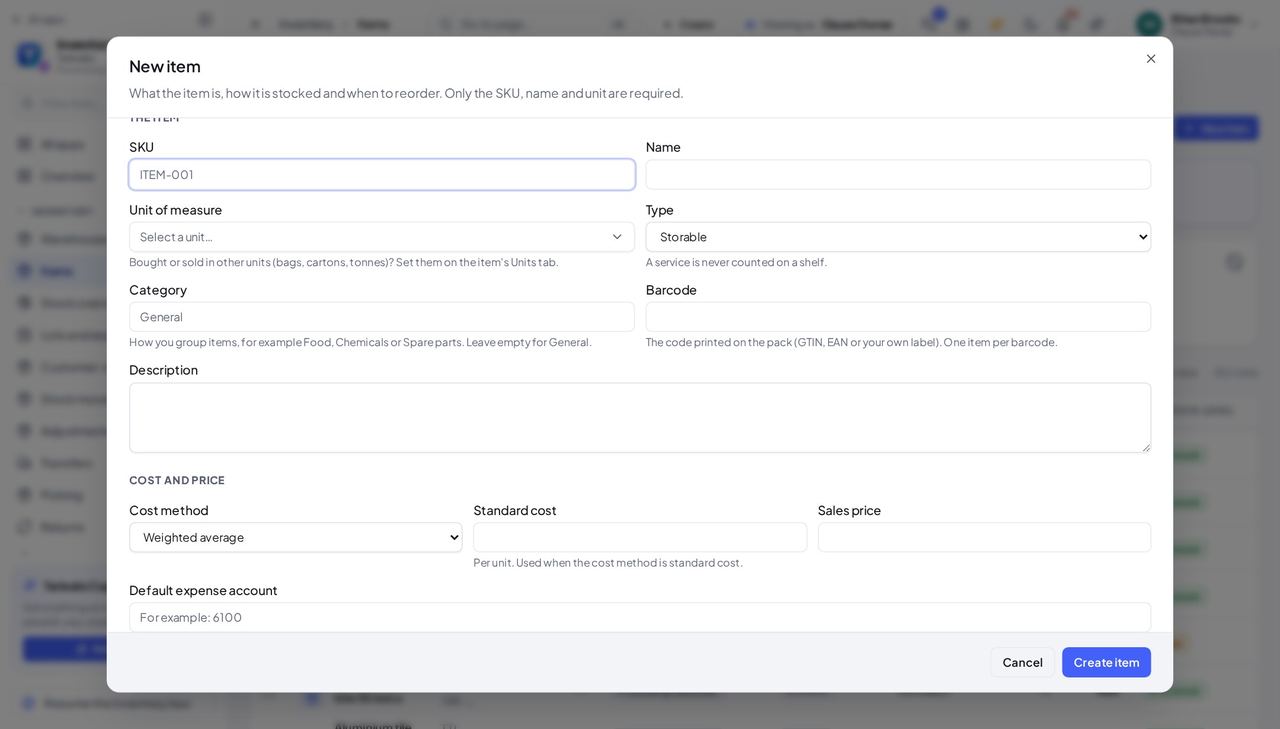
You should see An order line for the item that names no account uses this one; the buyer can still type another on a line.
Decide when a count needs a second person #
Where Inventory » Adjustments » Count rules » New rule
- Open Adjustments, press Count rules, then New rule.
- Choose an item or a category and set the tolerance: a quantity percentage, a line value, or both.
| Field | What to put in it |
|---|---|
| One item / A category | The rule applies to one item, or to every item of a category |
| Most a line may differ (% of what the system holds) | Beyond it, the count waits for a second person |
| Most a line's difference may be worth | The same limit in money |
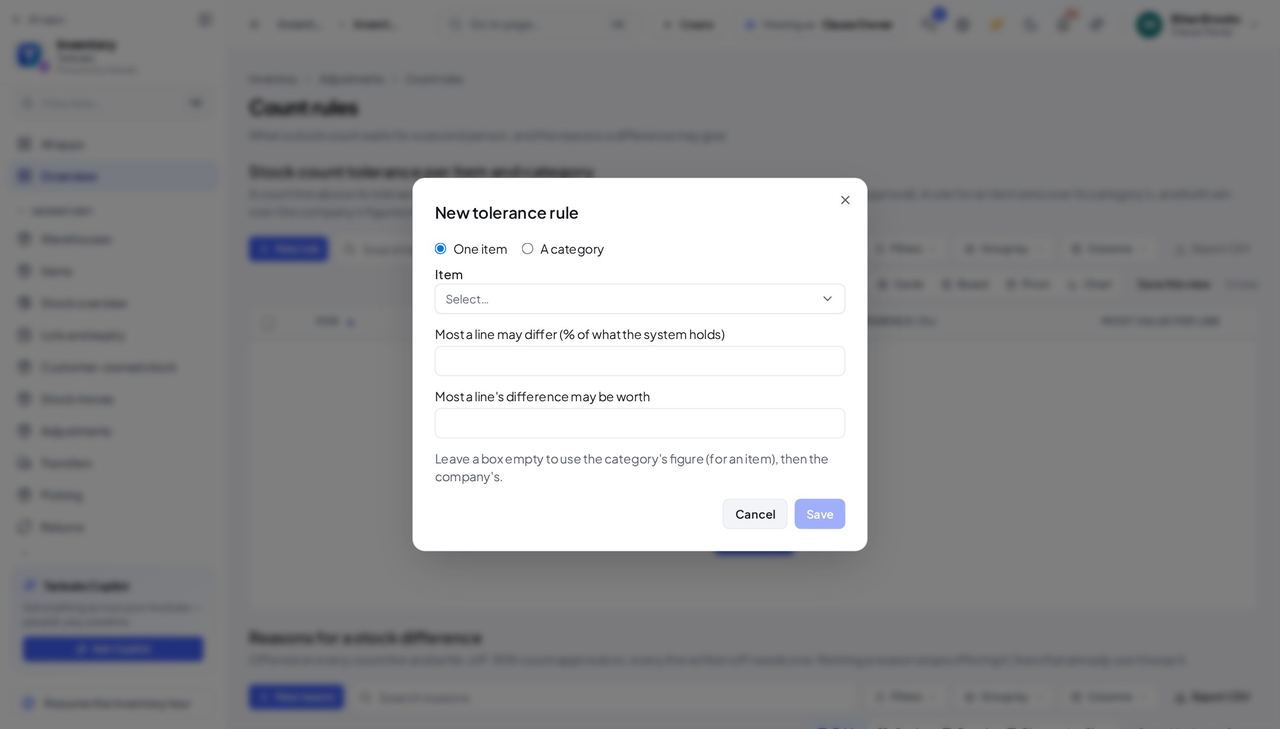
You should see Once your company turns Count approval on, a count beyond its tolerance waits for an approver who did not take part in it; they approve and post it, send it back for a recount, or reject it.
Watch out While the company keeps its two-person rule for counts (on by default), the approver must be someone who did not take part in the count.
Worth knowing Count approval is switched on by an administrator in Settings, under the inventory features.
Use cases — the work, step by step
Each one is a sequence somebody actually performs, with the screen behind every step. Every screen here was opened in the product as this role before it was published.
monthlyFreight to land on last week's receipt #
The forwarder's bill arrives after the goods; the landed cost puts it on them.
Open the received order; Landed cost; amount, description, Save draft.
Inventory » Purchase orders » a received order » Landed cost — verified: the page says “Add a landed cost”; the page says “Spread by”; the control is offered; no “verify” anywhere on the page; no “Network error” anywhere on the page Post it: the receipt layers' unit cost rises by the share; the order shows it as Posted.
Inventory » Purchase orders » a received order » Landed costs — verified: the page says “Landed costs”; the page says “Posted”; the control is offered; no “verify” anywhere on the page; no “Network error” anywhere on the page
after the counter finishesPost a blind count #
The counter saw no system figures; the difference is yours to judge before it is booked.
Open the count sheet: System says, Delta and Worth are there for you.
Inventory » Adjustments » a blind count » Open the count sheet — verified: the page says “Cement bay blind count”; the control is offered; the control is offered; no “verify” anywhere on the page; no “Network error” anywhere on the page Review and post books the differences; a count nobody confirms books nothing.
Inventory » Adjustments » a blind count » Open the count sheet — verified: the page says “Cement bay blind count”; the control is offered; the control is offered; no “verify” anywhere on the page; no “Network error” anywhere on the page
You can also do everything the buyer and the warehouse do. The audit trail is not yours: it needs the company-wide audit key.
Administrator
See who posted which stock write, and when.
Reads who posted which stock write and when. The audit trail needs the company-wide audit key, so it is the administrator's (or the auditor's) screen: the inventory manager does not hold it.
What you will be able to do
- Read the inventory audit trail
1 steps, each one carried out in the product on .
Find a lot's holds and date changes #
Where Inventory » Audit trail
- Open Audit trail and search for Lot.
- Each hold, release and change of a lot's dates is a row with who did it and when.
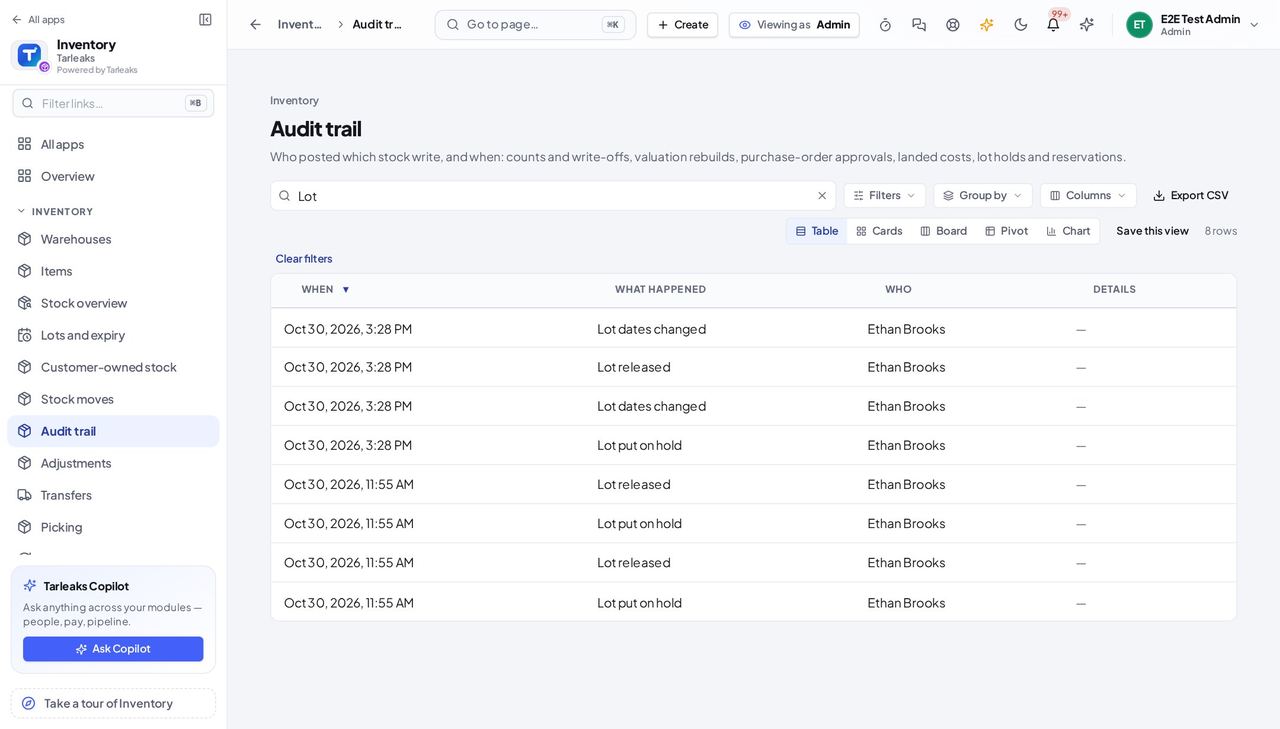
You should see Lot changes are on the same trail as the stock writes.
This screen needs the company-wide audit key, so it belongs to the administrator and the auditor. Everything else in Inventory is described in the roles above.